Ski bindings, whether they be for Nordic skis, Alpine skis, Telemark skis, or Randonee skis (Alpine Touring), are the unsung heroes of the world of skiing. Without bindings, skis are rendered useless for they’re the direct interface between human and technology (skis). Their purpose is to enable us to exert control over the skis.
Pretty important, right?
Well, the reality is that for many of us they just represent an additional cost to those already expensive skis we’ve just purchased.
And after the bindings have been mounted to the skis, generally the only other times we consider them is when they break or don’t work as expected.
Support Tahoe Trail Guide with a financial contribution via PayPal (single contribution) or Patreon (reoccurring contributions). Your support of Tahoe Trail Guide is very much appreciated!

The design and construction of skis (and their bindings) is representative of any invention that’s required a direct human interface to operate. This interface is, and probably will always be, the Achilles’ heel of invention.
Simply put, no matter how fantastic an idea may be, if it’s not user-friendly it’s not going to be used. So it shouldn’t be a huge surprise that, although ski design and construction has definitely evolved over the millennia, bindings have truly been the crux of the sport (or mode of transportation and survival).
The following video features some of the bindings highlighted in this article, and how to click in and out of them. The video also contains brief imagery and discussion of xc ski boots in relation to the bindings.
To try to describe all of the historical mechanisms and manifestations of ski bindings would be encyclopedic in length. And, it’s a lesson best saved for another day. Suffice it to say that for thousands of years people have been attempting to develop ski bindings that don’t:
- lacerate
- chafe
- crush their toes, feet, or ankles
- cause them to break their ankles or knees in a fall
- inhibit blood circulation which can lead to frostbite
- wreck or destroy their boots
- or, simply break free from the ski.
Yet the bindings still need to provide adequate control with which to run the ski. They also need to feature a relatively easy release mechanism.
Throw into the equation the fact that there are many unique skiing disciplines to practice. And, each often requires a binding that meets its specific needs. So, you have a pretty complex problem to solve!

Despite how important bindings are to skis, the laissez faire attitude I mentioned toward them is not necessarily unwarranted. They’re not nearly as sexy as the actual skis or ski boots. And, they don’t require much attention after they’ve been mounted.
Well, other than keeping them free from snow and ice and other debris when you’re skiing so that you can put them on and take them off easily enough. That, and it’s always helpful to periodically check them for wear and tear and loose screws.
I suspect the main reason we often take bindings for granted is due to their evolution and subsequent standardization.
You want to know something funny, though? You can buy nearly any alpine ski boot from any manufacturer. Then, you can wear it with nearly any set of rental skis (bindings). And, this is whether you’re at a downhill resort or ski shop across the country thanks to standardization.
However, for years, this hasn’t really been the case with cross-country skis.
Why hasn’t there a standard binding used in cross-country skiing? Well, why do some people prefer iPhones while others prefer Androids?
Call it the blessing and the curse of a free market. There’s no right or wrong answer as to what brand of cross-country ski binding to use. However, there are more effective choices in types of bindings based on intended use.
You just need to be aware that only in recent years has there been a trend toward standardization across the board for cross-country ski bindings. And this has come about as Salomon has finally gotten onboard with NNN (New Nordic Norm) compatibility via their ProLink boots/bindings.
Interestingly enough, however, in the winter of 2024/25 Madshus debuted their Redline Skate X boot/binding system. It looks cool and it probably works fantastic. However, just when everything was beginning to be settle down and become standardized across the boards, we now have yet another proprietary binding system to consider!
Types of Bindings Used In Classic Cross-Country Skiing
Cross-country isn’t like downhill-oriented skiing disciplines. For downhilling, you want to be “locked in” as tight as possible (foot to boot and boot to binding).
Mobility is paramount in classic cross-country skiing.
The foot needs to be snug (but not too tight) in the boot to provide control over the ski. But, it needs to be comfortable enough to wiggle your toes and flex your feet. The ski boot needs to move freely in relation to the binding for you to properly execute diagonal striding.
That’s why the metal bar at the toe of the ski boot is the only attachment point between boot and ski. The contemporary exception is the second bar with the SNS Pilot boots/bindings system. But this system still primarily relies on the front bar.
Although you’re clicked into the binding with that bar, this union is a hinge rather than a stationary locking mechanism.
Assuming the cross-country ski bindings have been mounted in the standard position (pin line directly over the balance point of the ski), your foot is essentially over the apex of a classic ski’s second camber.
Classic track skis and boots or light touring gear will have firm soles but soft uppers.
The hinge allows you a “free heel.” Coupled with the softer boots, you can flex your foot like a runner. This means that during “push-off,” all of your body weight will be focused on the flexed foot. Therefore, you can compress the ski (pushing the grip zone into the snow) and move forward.
For more information about this concept, read…
Cross-Country Skiing Explained (Part 3): Grip Zone of Classic Cross-Country Skis.
The mobility inherent with xc skis (and bindings) ensures you won’t be mistaken for a zombie shambling across the field. By having a free heel and wearing comfortable boots, you can move naturally. This is particularly evident when not performing actual technique such as when negotiating deep powder (i.e. walking).
As I’ve stated previously, there hasn’t been a standardized binding/boot system that’s compatible with all other bindings and boots. The closest to come to this is with NNN bindings. Unfortunately, so many boots over the years (decades?) have used a one-bar attachment system so many legacy bindings look very similar to NNN bindings.
Therefore, when navigating this realm, you need to be certain of what you own or are looking to purchase.
Many beginner and intermediate cross-country skiers aren’t aware of this discrepancy. And they become frustrated, for example, when they bring to the Nordic ski center at which I work their own skis (bindings) or boots after having forgotten one or the other at home, only to discover they can’t just rent the one missing component because our binding systems aren’t compatible.
I would estimate that this occurs about 50% of the time. No big deal if you have money to burn. But, having to rent a whole cross-country ski package when you already own a full setup (but forgot one component) can be frustrating. I suspect that this is a mistake made only once.
I’m not going to list every possible variation of every binding on the market. There are simply too many options. But the following list represents the majority of what’s available and in use today.
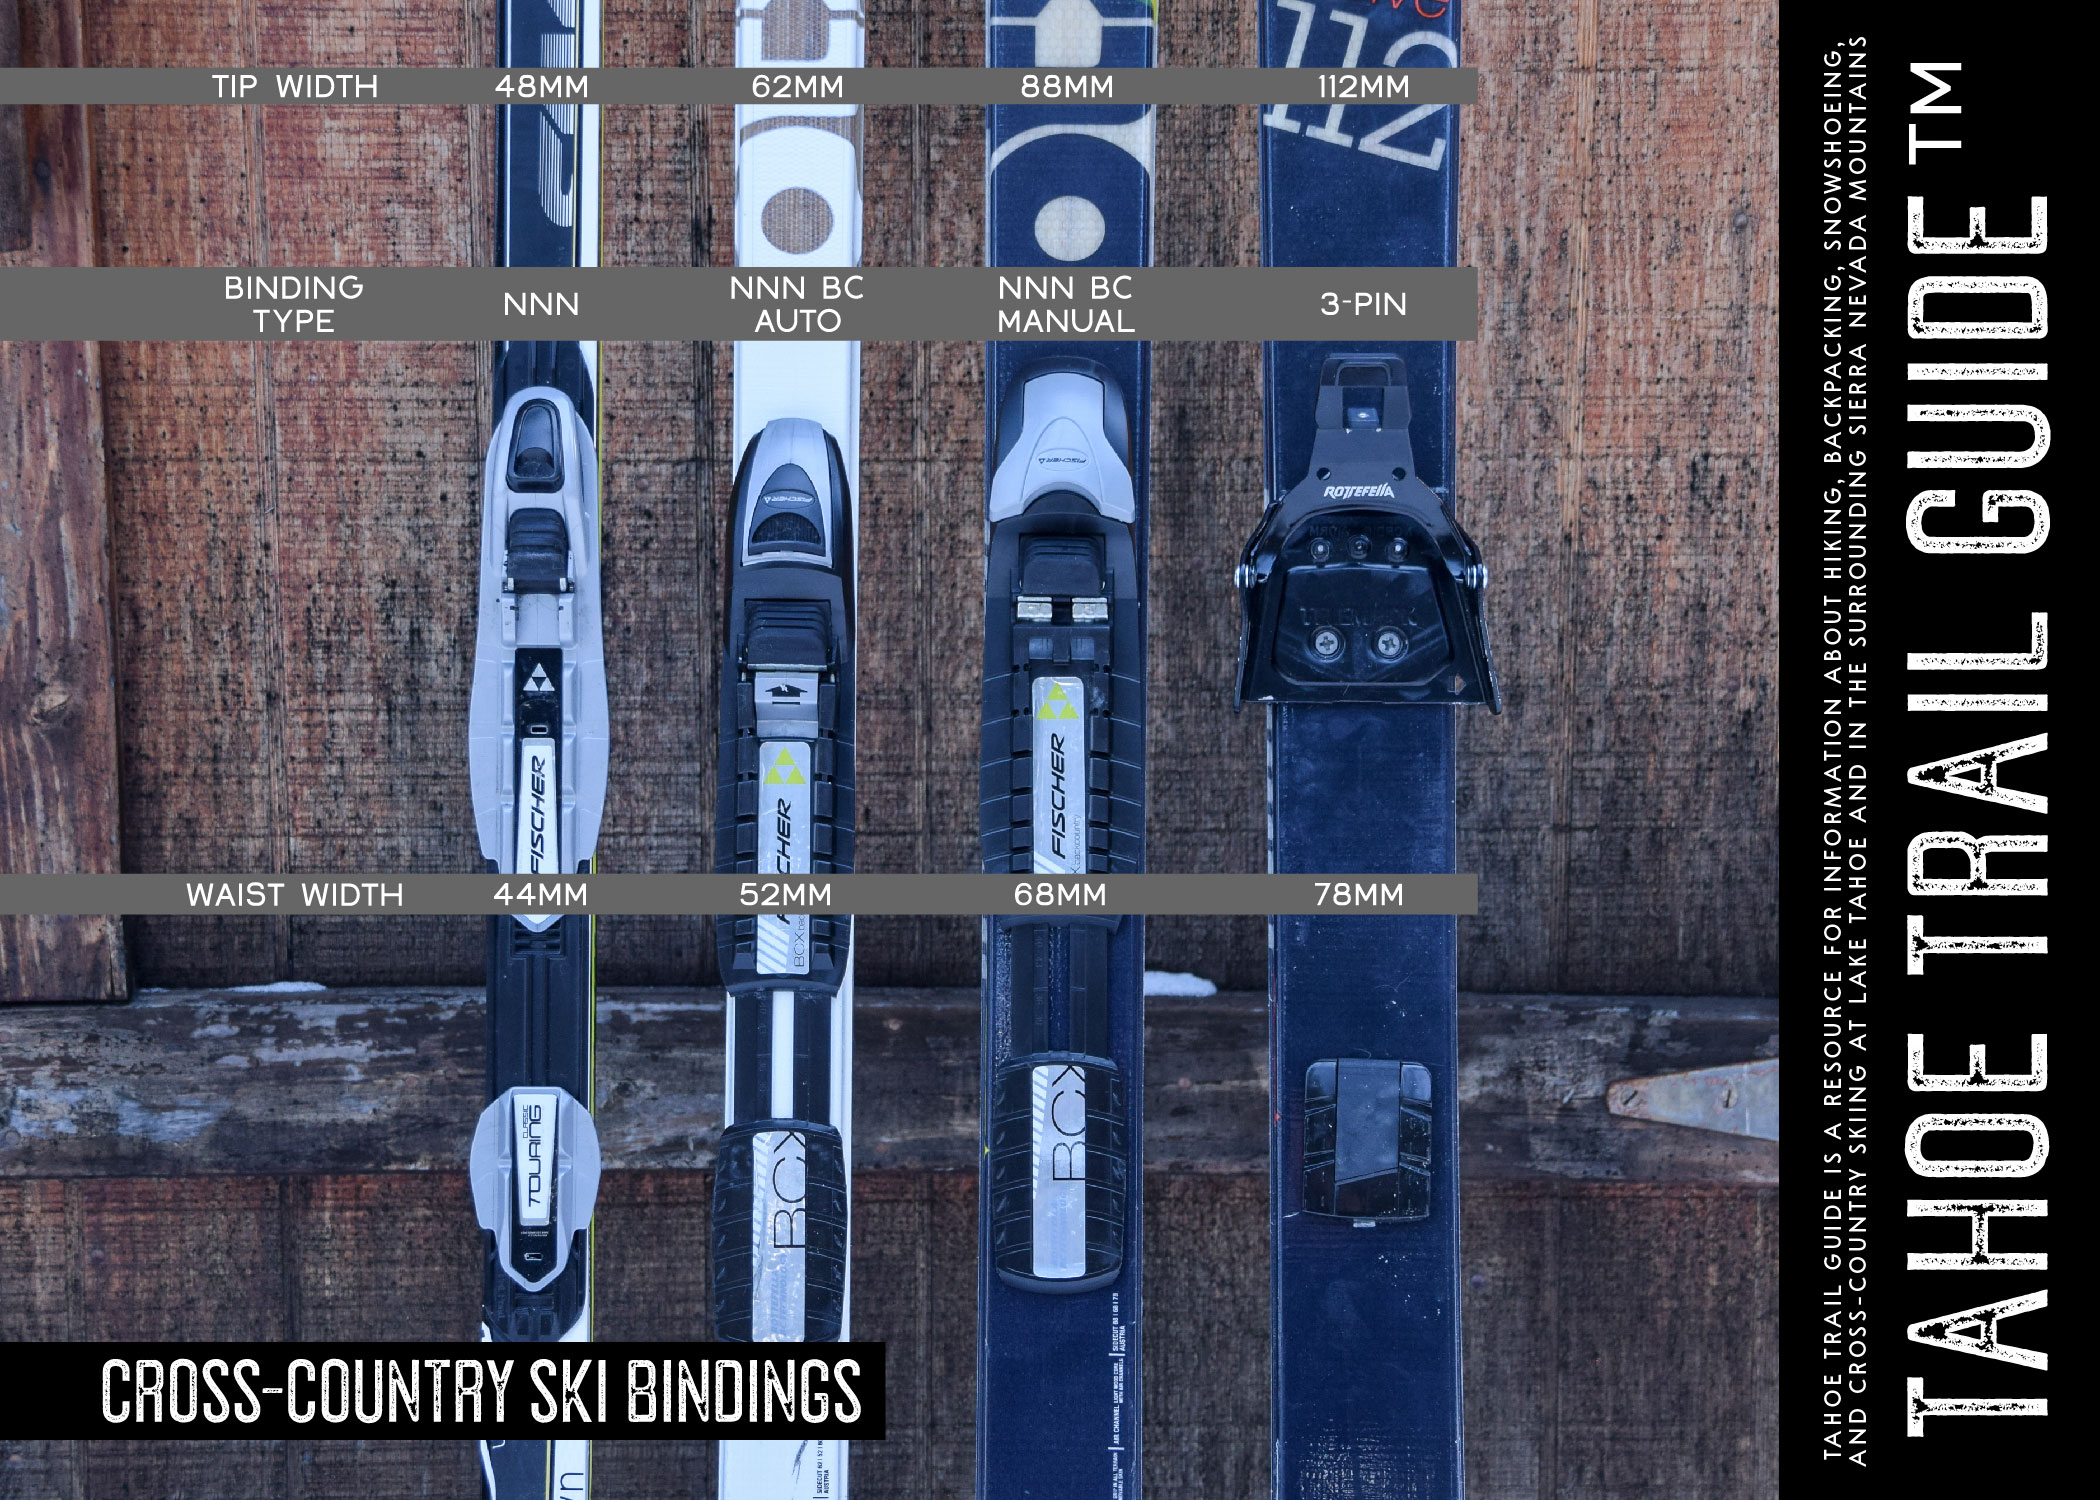
NNN (New Nordic Norm)
- One lightweight bar system and a relatively wide but shallow platform
- Variations include multiple auto versions, as well as manual locking mechanisms
- Appropriate for classic track skis and a very lightweight touring setup (i.e. not recommended for off-track/backcountry skis wider than 60mm)
- NNN has been around for decades and is compatible with all NNN boots (i.e. an NNN boot manufactured in 2018 will work with an NNN binding that’s 20 years old)
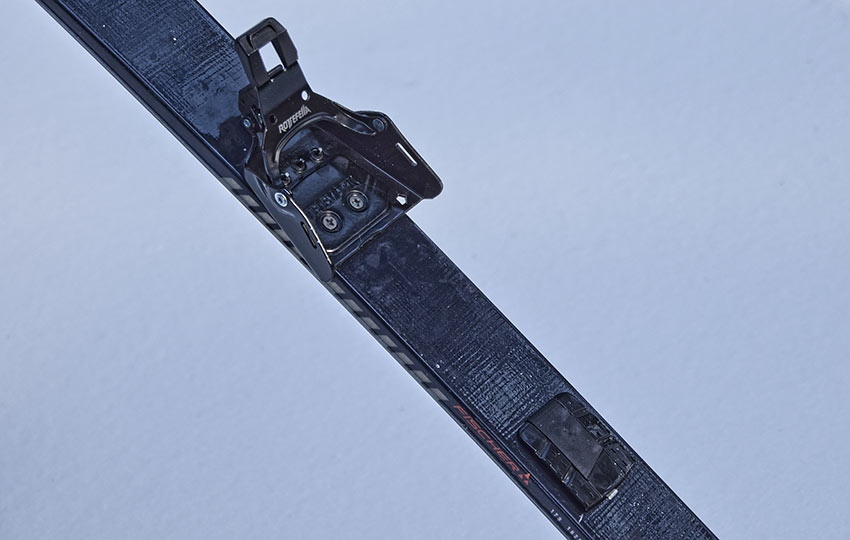
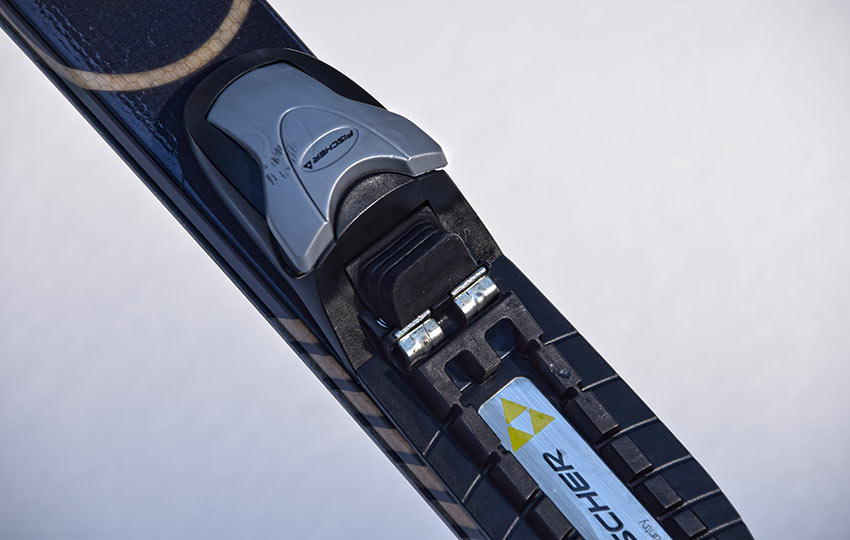
NNN BC (New Nordic Norm Backcountry)
- One larger heavyweight bar system and a relatively wide but shallow platform
- Variations include an auto version, as well as a manual (Magnum) locking mechanism
- Fine for off-track/backcountry touring skis that don’t exceed 90mm in tip width and 70mm in waist width — some xc skiers advise against mounting NNN BC bindings to skis more than 70mm wide at the tip, but I have NNN BC Magnum bindings mounted on Fischer Excursion 88mm backcountry cross-country skis and they work just fine
- NNN BC has been around for years and is compatible with all NNN BC boots (i.e. an NNN BC boot manufactured today will work with an NNN BC binding made years ago)
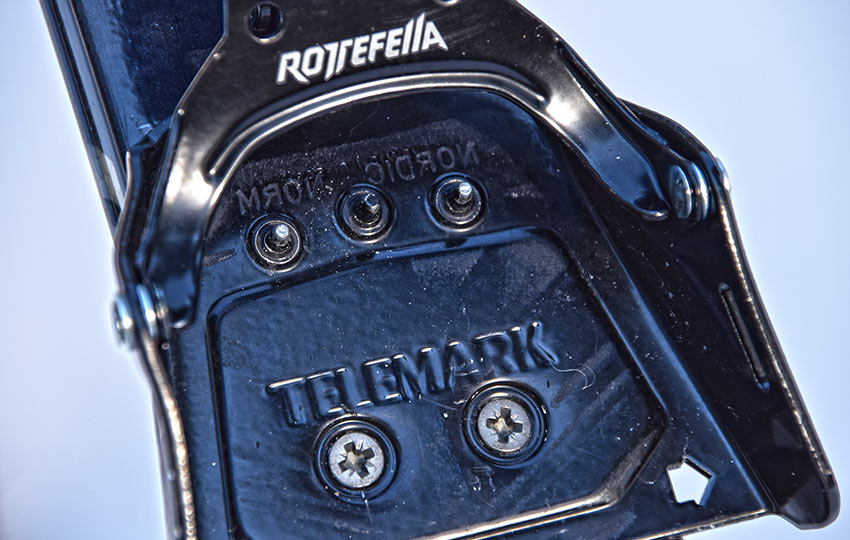
3-Pin aka NN (Nordic Norm) and 75mm
- Three pins that seat into the “duckbill” of the ski boot, as well as a bail that locks down over the duckbill
- Appropriate for off-track/backcountry touring skis with tips wider than 90mm and waists wider than 60mm
- 3-Pin used to be the standard binding found on cross-country skis, but was eventually determined to be too much binding for contemporary recreational cross-country skiers using modern, thinner track skis (replaced by NNN)
- 3-Pin bindings have been around for decades and are compatible with standard 3-Pin boots (i.e. a cross-country skiing 3-Pin boot manufactured today will work with a 3-Pin binding made years ago)
- Standard cross-country ski 3-Pin bindings are very basic and don’t usually incorporate cables into their design (to secure the heel of the ski boot), although you can mount lighter duty cable 3-Pin bindings to backcountry xc skis if you desire (these types often have a removable cable that you can fix to the binding before your descent)
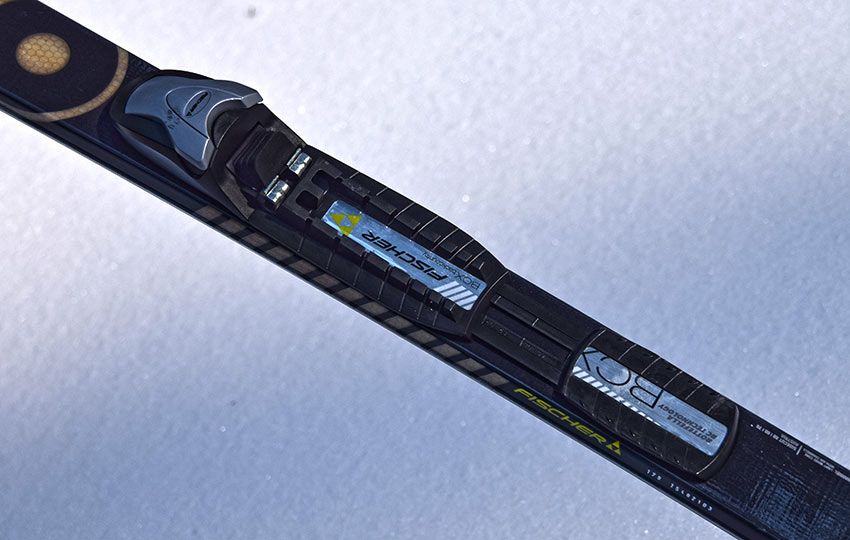
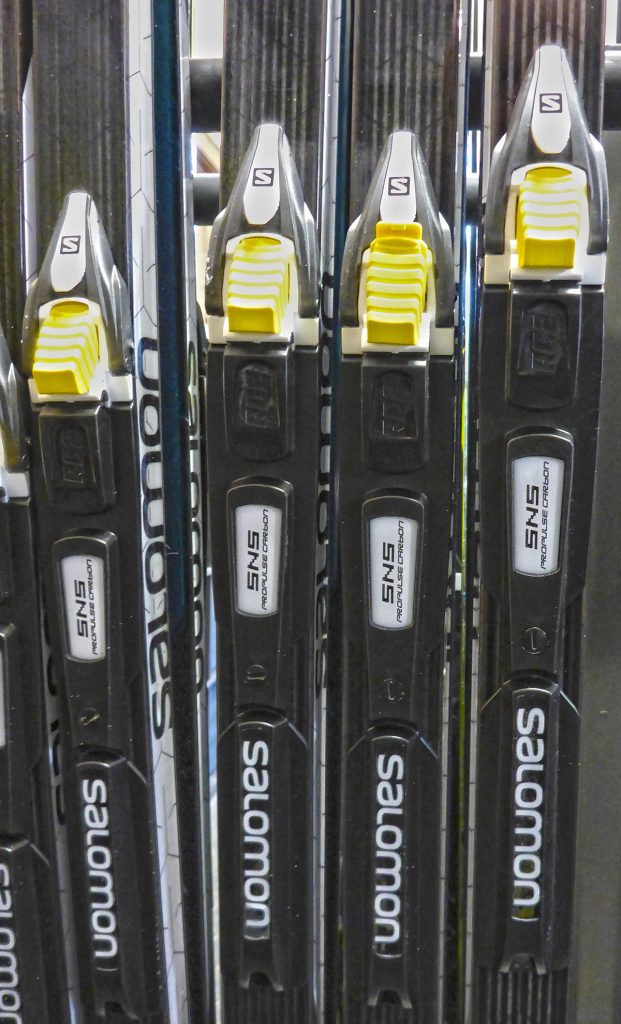
Salomon ProLink
- One lightweight bar system and a relatively wide but shallow platform
- New as of 2018, and is compatible with NNN
- Variations include auto versions, as well as manual locking mechanisms
- Appropriate for classic track skis and a very lightweight touring setup (i.e. not recommended for off-track/backcountry skis wider than 60mm)

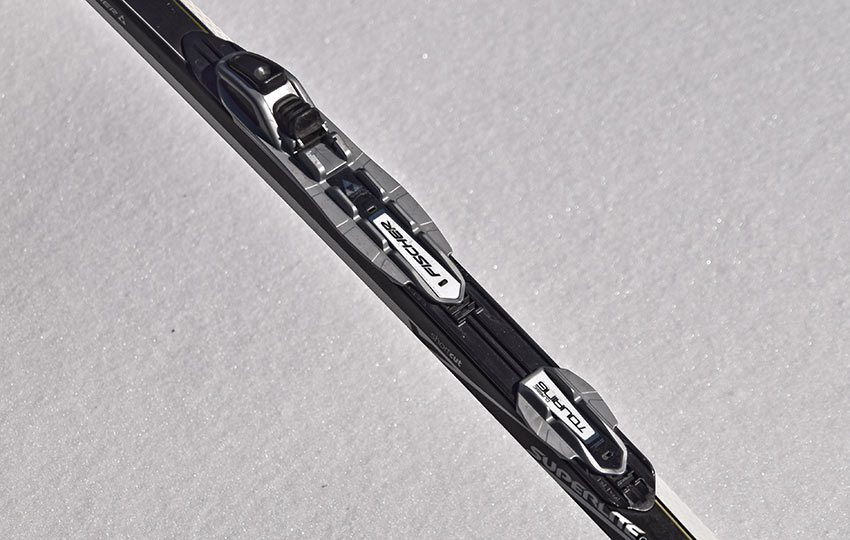
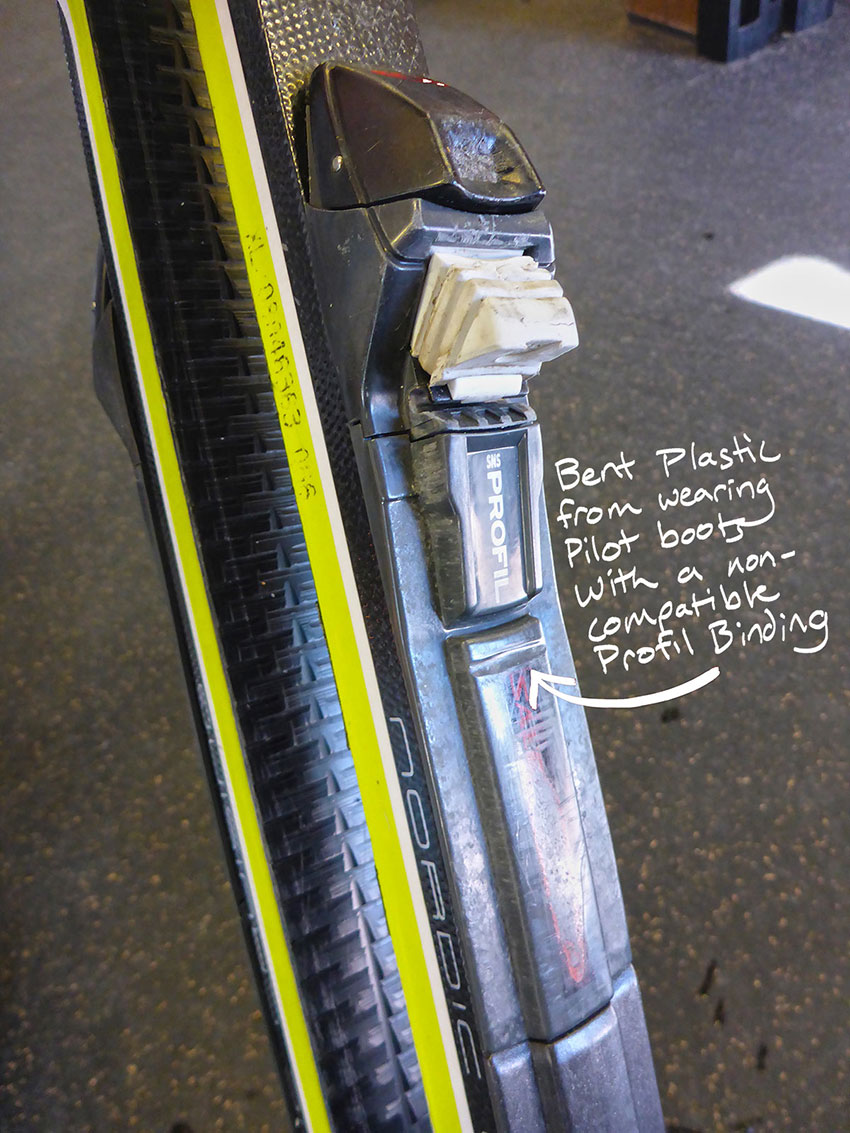
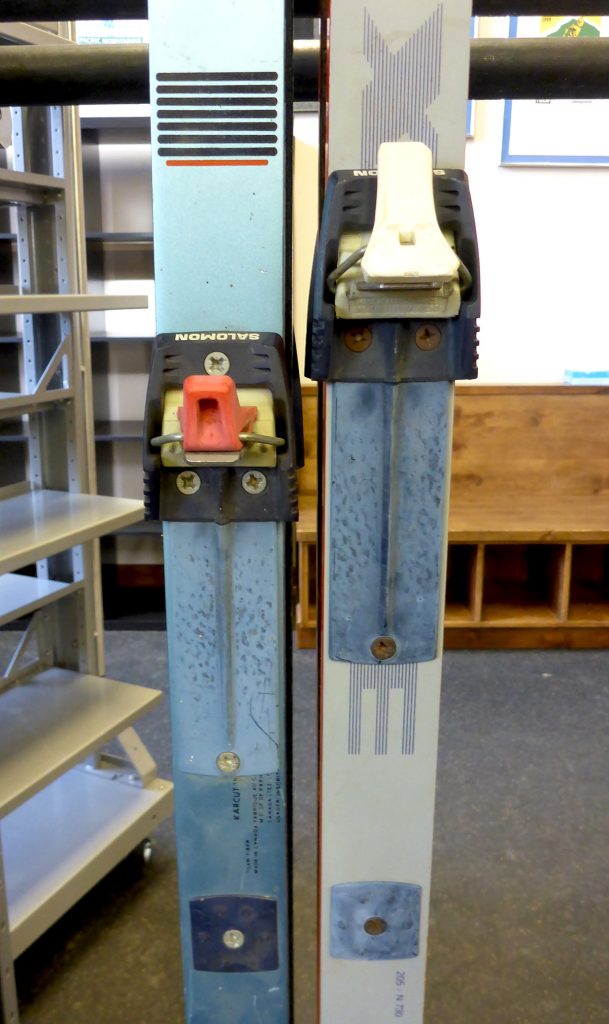
Pilot SNS (Salomon Nordic System – legacy binding)
- Two lightweight bars system with the first bar to connect the toe of the boot to the binding and the second to click into a spring loaded return mechanism at the ball of the foot
- The Pilot platform feels more narrow to me and is slightly taller than NNN or SNS Profil
- SNS Pilot bindings were designed primarily for skate skis (thanks to the second bar) rather than classic skis, but still can be used for classic skiing and are fine for track skis and a very lightweight touring setup (i.e. not recommended for off-track/backcountry skis wider than 60mm)
- Variations include auto versions, as well as manual locking mechanisms
- The Pilot system will eventually be phased out as ProLink takes a front row seat in Salomon’s boot/binding fleet
Propulse SNS (Salomon Nordic System – legacy binding)
- An SNS binding that is designed more for classic skiing and is compatible with Pilot boots because it features a gap large enough to let the second bar of the boots sit untouched
- The Propulse binding will also be eventually phased out as it’s basically an extension of the Pilot system
Profil SNS (Salomon Nordic System – legacy binding)
- One lightweight bar system with a relatively shallow platform
- Some Profil bindings accommodate some Pilot boots (not the other way around), but finding matches can be like winning the lottery
- This is older technology and will eventually be obsolete, but you can still find the bindings and boots on the market
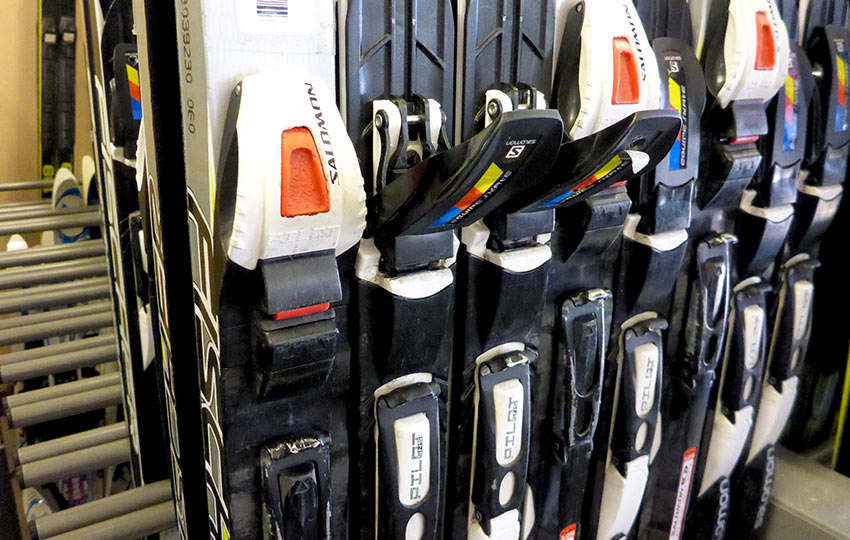
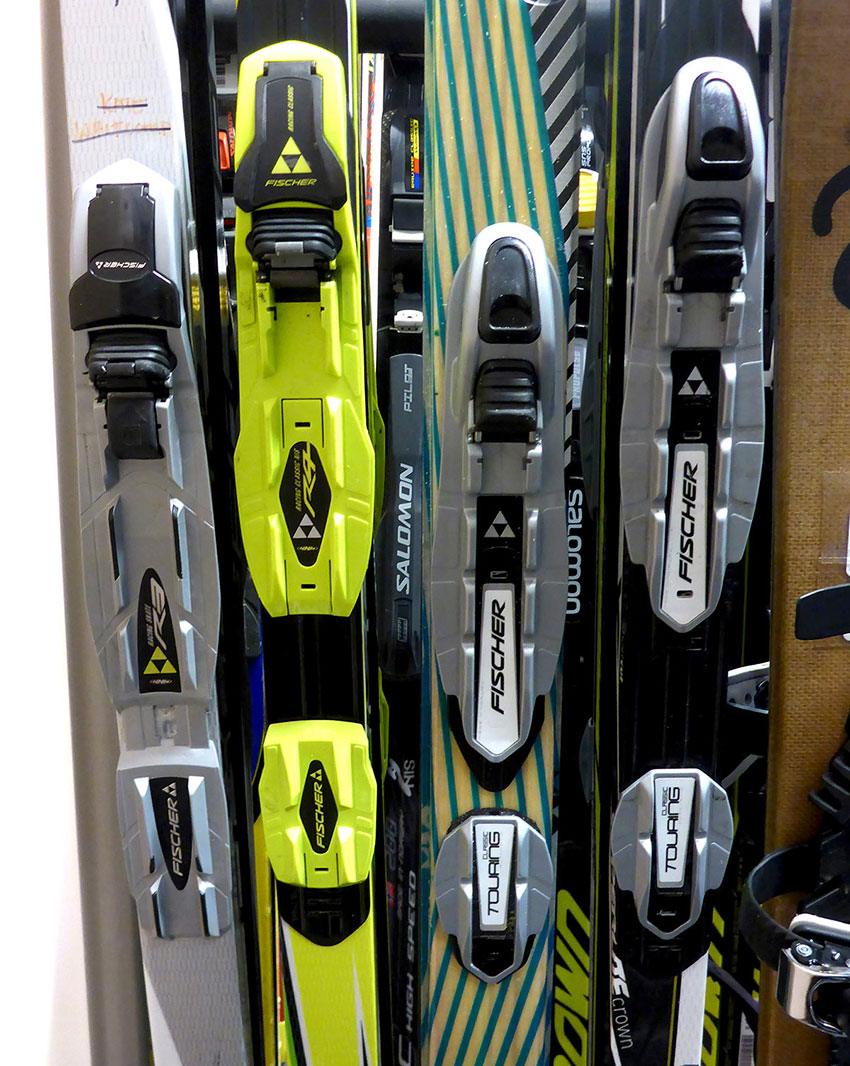
You can probably guess why so many people get confused about compatibility with cross-country ski bindings. Except for the 3-pin variety, all of these bindings accept a small metal bar (found at the toe of a ski boot) which connects the boot to the binding.
To build upon this confusion, there are countless variations of these bindings in circulation. And just for good measure, let’s also throw into the mix all of those “legacy” systems (i.e. old as f— skis and bindings that still get pulled out of the attic once a year).
On any busy day at the Nordic center, I bear witness to dozens and dozens of different binding systems. They all perform the same basic function but are not usually compatible.
All bindings designed for use with track skis basically perform in the same manner. Clearly, each manufacturer will argue this point, but unless you’re an avid racer or World Cup skier, you’re probably not going to notice a huge difference in performance.
There are no small, medium, or large versions of track ski bindings. However, they do adjust to accommodate ski boots of different sizes.
That said, 3-pin bindings are larger than NNN BC (Magnum). In turn, the manual version is larger its NNN BC (auto) brethren. In that last case, though, the actual bar is the same size but the overall manual binding is bigger. And, finally, the NNN BC bindings are larger than NNN and SNS bindings.
I find it best to marry the size of the binding to the size of the ski.
For example, I’ve mounted a 3-Pin binding on my Fischer S-Bound 112s. But, I have an NNN BC (auto) binding on my Fischer Spider 62s. The basic idea is that you don’t want a small binding on a wide ski. And, you don’t want a large binding on a thin ski.
Too small of a binding on too wide of a ski will not provide enough leverage. So, you won’t be able to make clean turns. And, this may actually result in you snapping the binding clear off of the ski (due to torsional forces).
Too big of a binding will hang over the edges of the skis. This affects performance when edging or turning, as well as possibly putting too much torque on the ski.

Considerations for Manual and Auto Bindings in the Backcountry
Auto bindings are fine for the groomers. But they’re not as ideal for off-trail and backcountry travel. Why? Because they aren’t as secure and can be challenging to click in while on soft, powdery snow.
For example, the spring of an NNN BC auto binding is quite firm. Unless you have a solid ground from which to apply downward pressure, you may end up having to fiddle around for a few minutes before positively clicking in. I’ve had it happen where I’ve tried to click in to an NNN BC auto binding on deeper, softer snow and I basically kept pushing the ski further into the snow until I compressed the snow firm enough (for me to positively click in).
I realize this sounds like splitting hairs. However, it can be frustrating to go through this when the wind is howling and you’re standing in whiteout conditions. And being frustrated, especially under difficult circumstances, can lead to making poor decisions.
Another worst case scenario that can occur with auto bindings in the backcountry is during the disengage phase. The opposing forces (pushing on the release button with the ski pole tip while pulling your boot away from the binding) can cause the ski to fly down the trail or off the mountain. That is, if you’re not conscious and careful about taking your skis off. I see this happen often at groomed trails. And, as humorous as it can be in a controlled environment, it’s not so funny if you ski goes flying off of a cliff!
Actually, one of our rental customers experienced this very problem during the 2017/18 winter. He stopped at a scenic view point and pulled off his skis (to rest and take in the sights). But, while removing one of his skis he sent it flying down the side of the mountain. Needless to say, he had about a 3-mile walk back to the rental shop. Not my idea of a fun time!
Better to just reach down and unlock the binding with your hand. Then, immediately flip the ski on its side or upside down so that it doesn’t slide away.
Even with most auto bindings, you can still just reach down and manually release your boot from the binding. You may have to press the button hard with your finger, but it’s possible. This is a good practice to get into whether you’re in the backcountry or on the groomers.
One last note is that it’s easier to clear out snow and ice from manual bindings. This comes in handy in the backcountry.
Last Thoughts about Classic Cross-Country Ski Bindings
This article isn’t about how to mount bindings. However, I wanted to mention a couple notes about the task since I briefly introduced the topic above.
The universal approach is to place the pin line (metal bar) at the balance point. This is evident by the ski remaining level when you raise it off the snow.
However, some people will alter their bindings so that the pin line falls just behind the balance point. In this example, their weight is set back slightly. This allows the ski tips to float more when skiing downhill in deeper snow. However, placing the binding back makes it so that the tip drops when raising the ski with your boot.
Cross-country ski racers will occasionally mount their bindings rear of the balance point to prevent their skis from coming out of the tracks while striding. They also get more glide because they’re marginally set back off of the grip zone. However, in this situation, you have to really have great diagonal stride technique to run the skis.
On the other hand, some people mount the binding so the pin line is just forward of the balance point. This places more of your weight forward and allows you to get better grip. It also causes the ski tip to rise when you raise your boot and ski. This could be helpful for traveling in deeper snow across flat zones and uphill. The downfall of this approach is that you get less glide. And, because you’re slightly forward on the ski, you run the risk of torpedoing the tips into deeper snow.
My recommendation is to just mount your bindings in the standard position so as to avoid inconsistent performance.
One caveat to this is that with newer NNN bindings that attach to NIS or IFP plates, you can move the bindings fore and aft quite easily. I seldom do this, but it is a possibility.
I realize that I’ve discussed bindings before boots in this article. Just know that they’ll be addressed simultaneously when purchasing new gear (or gear new to you). The reason for this is that manufacturers design their boots to work with certain types of bindings.
And each manufacturer designs their boots based on what they perceive to be an idealized foot. So, it’s more important to find a boot that fits your foot properly. Then, buy the binding related to the boot. Do that rather than first buying the bindings and hoping to find a boot that comfortably fits your foot (and is compatible with those bindings).
Here’s a fun article (I found online) about the contemporary history of cross-country ski bindings…
Pins to pivots, and the nightmares of the ’90s
Cross-Country Skiing Explained Articles and Videos
Please note that I wrote and produced the Cross-Country Skiing Explained series of articles and videos with the beginner and intermediate cross-country skier in mind. This is the demographic for whom I most often serve(d) while working in the outdoor recreation industry at Lake Tahoe. I basically treat these articles and videos as extensions of the conversations that I have (had) with those customers.
That said, expert skiers probably could take away something of value from these resources. Just know that I don’t address race-oriented philosophy, technique, or gear selection.
Considerations for buying cross-country ski gear (new and beginner xc skiers)
- Intention, Types of XC Skis, and Whether to Buy New or Used (Part 1)
- How Much Gear to Acquire, Evaluate Your Commitment, Value of Taking XC Ski Lessons (Part 2)
- Can One Set of Classic Cross-Country Skis Work for Groomed and Off-Track XC Skiing? (Part 3)
- Can I Use One Set of XC Ski Boots for All of My Cross-Country Skiing Needs? (Part 4)
- Overview of Off-Track and Backcountry Cross-Country Ski Gear
- Invest in Technique More than Gear
Classic Cross-Country Ski Components
- Introduction to Classic Cross-Country Skis (Part 1)
- Geometry of Classic Cross-Country Skis (Part 2)
- The Grip Zone of Classic Cross-Country Skis (Part 3)
- Types of Bindings for Classic Cross-Country Skiing (Part 4)
- Ski Boots for Classic Cross-Country Skiing (Part 5)
- Classic Cross-Country Ski Poles (Part 6)
- FAQs about Classic Cross-Country Skiing
Waxing Your “Waxless” Cross-Country Skis (for beginner and intermediate xc skiers)
- Introduction to Waxing Your Waxless XC Skis
- Step-by-Step Waxing Tutorial
- FAQs About Waxing Your Waxless XC Skis
Cross-Country Skiing Techniques, Demonstrations, and Related Concepts
- Outdoor VLOG (emphasis on the cross-country skiing experience)
- Cross-Country Skiing in Challenging Conditions
- Considerations for Winter Adventure in Lake Tahoe’s Backcountry
- Using the Side-Step and Herringbone Techniques in the Backcountry
- 10 Tips for Spring Cross-Country Skiing in the Backcountry
- 5 Reasons to Love Spring Cross-Country Skiing
- Considerations for Cross-Country Skiing During the Fall and Early Winter
- Discussing the Goal of Becoming a Better Cross-Country Skier and Embracing Backcountry and Groomed Terrain in Pursuit of that Goal
- The Cross-Country Skiing Experience: Immersing Yourself in Winter
Hi! Great article.
I have a set of the old Salomon bindings skis and boots. Been using them for years. They work pretty well on groomed terrain, why do you recommend upgrading from this system? Thanks
Thanks for reading, and for the kind words 🙂
As far as “upgrading” goes, I’d stick with what you have so long as it’s working for you. I don’t know that I actually said that SNS systems should all upgrade. Rather, what I meant is when people are buying new to go with NNN as it’s not the most standardized option. All of the older SNS stuff will eventually phase out so that it’ll be more and more difficult to buy new boots for example. So, again, just stick with what you have for now, but consider moving to the NNN platform whenever you do decide to buy new. You’ll have tons more options for boots since all the main xc ski brands offer NNN options now.
Again, I appreciate the feedback! Let me know if you ever have other questions/inquiries 🙂
Thanks for the quick response!
I am actually referring to the bindings shown in the image below the discussion of SNS binding. The ones that have the bar I front of the toe instead of under. The ones with the red release clip.
Why are they so unfavorable?
Oh, gotcha!
Well, those bindings and skis are so old that you won’t be able to find any new boots for them. The skis most likely don’t have a sintered base, meaning that they won’t really hold glide wax. And the cambers of the skis, because they’re so old and used, probably aren’t stiff enough anymore to properly support your body weight (which means you’ll be dragging the grip zone all of the time). Based on those two last points about the skis, as far as I’m concerned, mounting new bindings to the old skis is out of the question.
If all you were doing was occasionally walking around your property, for example, I’d say to just stick with them. But if you really wanted to invest in your xc ski experience, I highly recommend buying a newer set of xc ski gear (skis, bindings, boots, and poles). Everything nowadays is just so much better than it used to be as far as performance and comfort are concerned. In the past 5-10 years there’s been so much renewed interest in cross-country skiing that manufacturers have taken note and, accordingly, have produced tons of high quality gear.
I’m not a gear snob. I can pretty much make anything work since I’m proficient with xc ski technique. However, that doesn’t mean that using “anything” will actually be fun. I’ve held on to some gear for far too long before finally admitting to myself that I’ve squeezed out every mile that I could from it (skis or boots or whatever). So I’ve learned over the years not to covet gear. It’s only tools for adventure, and if those tools are no longer suiting their purpose (outdoor adventure) I get rid of it. Nothing lasts forever, and that’s okay.
I’ve met so many people over the years who’ve rented new gear (from the resorts at which I’ve worked) and have had such a positive reaction at how much lighter, shorter, and more comfortable newer xc ski gear is (compared to what they had 20+ years ago, for example). So, that’s my two cents on the matter 😉
Love your videos and website – as a UK based backcountry newbie skier, local information is a little thin on the ground so using your information is invaluable.
I came to this page trying to find information on pin lines. I have a new pair of skis (Fischer Traverse 78) that I (stupidly) allowed the (online)shop to attach the bindings to (magnum manuals) and they mounted them with the pin line 15mm behind the balance point. That’s too much right? I’m tempted to take them off and do it again myself.
Thanks again for all your output – so so helpful.
Hey Ben!
I’m so sorry for my long delayed response 🙁 Not sure how I missed your comment, and I’m assuming you made a decision about your bindings already since it’s been a few weeks. However, I’ll give you some feedback just the same.
15mm behind the balance point does seem a bit out-of-range. But it sounds like it’s far enough away from the actual balance point that remounting the bindings could still be an option. That said, many track skis nowadays have shift-type bindings so that you can move the binding fore/aft a couple of clicks (that wind up being nearly 15mm anyway). With the binding set back, you’ll get more glide, but it’ll take more effort to compress the ski flat so that the grip zone will engage with the snow. Also, the tip will drop as you raise your ski. But by being back a bit, you’ll also get more float in deeper snow as you go downhill. So, although that positioning might not be ideal, it’s not the end of the world. I think, technically, my bindings on my Fischer Excursion 88s were mounted slightly behind the balance point as well. A previous boss of mine (when I worked at a gear shop) was the person who mounted the bindings on my skis and, in hindsight, I realized that he wasn’t quite as knowledgeable as I thought he was about xc ski stuff. I’ve always had good success with those skis, though.
Out of curiosity, how is it that you know for sure that the bindings are mounted behind the balance point? I find that the same balance test of the ski (resting the ski on a straight edge perpendicular to the ski to find the balance point) after the bindings are already mounted can yield a different result. Basically, the binding itself changes the ski’s balance point in the aforementioned test. So when you raise the ski up from the pin line does the tip drop quickly?
Again, I really apologize for not responding a lot sooner. Let me know what you ended up doing with your skis, though. I’d like to hear your feedback about the situation.
And thank you so much for the kind words. I’m glad to hear that you’ve found my website to be useful. I also hope you’ve been checking out my YouTube channel (which I’ve invested a lot more into these past few years). Oh, speaking of which, here’s a video I made about mounting a set of NNN BC bindings a couple of years back (if you haven’t already seen it)…
https://youtu.be/c5Zl3XY6hOY
Great article, Jared. Thanks.
I’m rediscovering cc skiing after being away for years, and I’m a little overwhelmed by all the choices. My first purchase was a set of Spider 62s with NNN BC manual bindings and some Fischer boots. So far so good. But I’d also like a setup for low key backcountry touring and the occasional cruizy telemark session at Dodge Ridge. Sounds like a 3 pin binding may still be the way to go? I have some old Karhu Tenth Mtn skis with Black Diamond cable bindings and beefy leather Merrill 3pin boots from the early 90s, but looking for wider skis to make those turns easier for this 25-years-older body. Love to hear your thoughts. Thanks!
Hey Scott,
Thanks for reaching out! And welcome back to cross-country skiing ?
The biggest off-track/backcountry xc skis that I have are Fischer S-bound 112mm. Fischer used to make some 125mm, but I think they’ve just gone to 112s as their widest skis. Still pretty wide all things considered.
I have basic 3-pin bindings mounted on them, and they suit me just fine. That said, there are far more serious xcd skiers out there that use 3-pins with cables, as well as stiff hard shelled boots. I tend to lean toward softer boots (even though they do have upper ankle support) as I focus more on diagonal striding when I’m out there. I’m still working on my downhill technique and probably could benefit from a stiffer setup. But, again, I tend to choose lower angle terrain and prefer those relatively shir softer boots for diagonal striding.
Anyway, the Fischer S-bounds seem to be some of the wider xc skis out there. Although most major xc manufacturers produce some type of beefy backcountry xc ski nowadays, making for a lot of options. I know inventory everywhere is low at this point, so it’ll be interesting to see next season’s selections. I’ve also found that manufacturers have phased out models over time. I suspect that it’s been based on demand. So, again, it’ll be interesting to see what they come out with for next winter.
Other than that, I’d say that a ski at least 90-112mm wide would suit you well. Not sure this has been super helpful because I don’t have any specific recommendations, but there are options for when your ready to update your gear.
Let me know if there are any specific brands/models that you come across that you wasn’t feedback on. I may be able to provide more specific info.
Thanks again for reaching out, and let me know if you have more questions ?
Hello. I have Skiboots XC Fischer Pro NNN. Can you show what kind of bindings belongs for my boots.
Hello! All NNN compatible bindings, i.e. Rottefella NNN (NNN II, to be precise), Prolink and Turnamic bindings.
Thanks for the question, Karin! Yes, like Magnus said … any of the current compatible NNN bindings will work. They’re all slightly different looking (as they’re made by different manufacturers), but so long a they’re NNN compatible they’ll be work.
Thank you for this write up.. I feel like my head is going to explode!!! Seriously! But had a slightly better understanding of the binding to boot.
Your welcome, Alexis. Yeah, lots of bindings over the years and lots of details to keep track of. But it’s becoming easier now that most manufacturers are embracing the NNN compatible binding for classic and skate skiing on groomed terrain and for really light touring. That should help to simplify things in the years to come so that xc skiers don’t have to pick and choose what brand of boot, for example, that they have to buy in order to be able to use certain bindings.
Anyway, thanks for the comment and let me know if you ever have any questions 🙂
Very comprehensive website and series of videos Jared, so thank you! You’ve really helped me get a handle on beginning waxing technique. I’ll add, since I’m relatively new to the sport and was recently in the market for two pairs of inexpensive beginner waxless classic skis, that Turnamic / IFP (NNN) and or Salomon Prolink probably makes the most sense from a “future-proof” “binding compatibility” perspective (for new users) on mostly groomed classic track. I was able to find some Prolink Salomon boots for my wife and myself, as well as some Orbiter IFP waxless skis on closeout, and it seems like NNN (for new users) might make the most sense (including 20 years of prior compatibility). For an old set of 30 year old Finnish waxless classic skis I found I was able to mount a pair of Salomon Prolink classic manual bindings and keep compatibility the same with the Prolink combi boots I bought. Anyhow, that’s was my take away trying to come up with a “minimalist” purchasing strategy. Thanks again for creating such a fantastic resource.
Hey Mark, thanks so much for the kind words and feedback! I’m glad I could be of service to you 🙂
I think going with an NNN platform is your best bet as far as covering your bases for years to come. I personally prefer the NNN platform. If you compare an NNN boot and SNS Pilot boot side-by-side you can see that the “tread pattern” of the NNN boot isn’t quite as high as the Pilot pattern. And although most contemporary NNN platforms are slightly wider than the actual ski (there’s some overhang on both sides), I feel like I’m more connected to the ski as a result. It also sounds like you’re taking a solid approach to building your collection of gear by making everything the same type of binding. It’s nice having a boot that’s compatible with all of the common binding systems available (for those times you find some good skis that already have bindings on them and you don’t want to remount new bindings), but you end up with a lot of gear to store and maintain! This can be a problem over time. haha
Anyway, I hope you have adequate snow to go out and try your new (and renewed!) gear. If you don’t, I’d be more than happy to send you a couple of feet of snow from Tahoe because we’ve been getting pounded by it the past few weeks. I think I’m shoveling more than I’m xc skiing at this point in the season 😉
If you do have any questions or want feedback on anything, feel free to reach out.
Jared
Mark: “[…] (including 20 years of prior compatibility).”
Even 29 years, since NNN2 (the current NNN) was introduced in 1990, so an enormous amount of old bindings is compatible with your new Prolink ski boots.
Mark: “[…] Prolink combi boots I bought. Anyhow, that’s was my take away trying to come up with a “minimalist” purchasing strategy.”
Combi boots is a very good choice in such a strategy.
Jared: “I can see why each ski manufacturer would have such unique interfaces — they want you to buy their bindings!”
Yes, in the case of Atomic and Salomon pre-drilling their skis with the Prolink/SNS screw hole pattern it was quite obvious. This was, however, countered by Rottefella through its introduction of an NIS mounting plate with that same screw hole pattern. Now, also Turnamic has its moutning plate, IFP, in a version for the Prolink/SNS screw hole pattern. Regarding Turnamic, its plate and binding is also a technical step forward in the development of mounting plates and movable bindings.
Hello, and thanks for your reply! One can also add that Prolink was introduced in 2016 and that it is a cooperation between Salomon and Atomic, just like Turnamic is between Fischer and Rossignol.
Again, thanks for the feedback! I’m definitely going to have to update this page soon. One thing I do appreciate about this whole xc ski binding industry shift is that it is leaning toward a universal compatibility. It’s been frustrating trying to explain to people new to cross country skiing that there are a million different combinations.
You’re welcome! Yes, uniting around the open domain technology of NNN is very good and has brought several great innovations already. It is just a little pity that NNN is also a trademark of Rottefella; otherwise all NNN compatible products could have the NNN logo on them making it very easy to recognize compatibility. Now one has to learn that NNN, Prolink and Turnamic are compatible.
Agreed. I work at an xc ski resort during the winter and it’s always a challenge explaining to people that the boots and skis they just bought used at a ski swap are incompatible, for example. Thanks so much for the insight into the world of xc ski bindings. I will continue my study of them and try to update this page with updated info related to the subject. I also checked out your website, and your roller skis look pretty cool!
Many thanks, Jared, and thank you for your well written and interesting texts here at Tahoe Trail Guide. Another aspect of ski bindings worth writing about is the interface between bindings and skis with screw hole patterns, pre-drilled skis and the different mounting plates.
Definitely a good point, especially now that there are so many variations. I can see why each ski manufacturer would have such unique interfaces — they want you to buy their bindings! At least the actual NNN platform accommodates any NNN boot. I will say this, though, that at the beginning of this season me and my co-worker had to mount 40-60 bindings on a bunch of new Salomon skis for our rental fleet. We were so grateful to discover that they all came pre-drilled! As a result we were able to mount all of the bindings in less than two days.
Jared: “We were so grateful to discover that they all came pre-drilled! As a result we were able to mount all of the bindings in less than two days.”
Yes, pre-drilling often comes in very handy. Did you mount only Prolink bindings or did you also use the NIS and IFP plates with the corresponding screw hole pattern?
We just mounted the Prolink bindings to the skis. Funny. I didn’t even realize that you could purchase separate NIS and IFP plates to screw on. I thought they were only factory-fused to the ski. But it makes sense that the manufacturers would make them available for people who want to update older skis or add the convenience of the plate system.
Here is the NIS plate for pre-drilled Atomic and Salomon skis or skis that have had an SNS binding: http://rottefella.no/bindinger/tilbehor/langrenn/rottefella-xcelerator-mounting-plate-796
Thanks, Magnus! I was looking at some examples yesterday. Looks like a relatively straightforward process to mount the plates. I personally like the convenience of the plate systems, although I’ve seen the occasional example where there is a slight amount of play/looseness between the plate and binding. I recall one specific example three seasons ago where a customer came to me with his NIS/NNN system. I was able to wiggle the entire binding even though it was “locked” to the plate. This definitely caused the skier to have some confidence issues with regard to his ability to control his skis, but I assume it was a fluke because it seems like the locking mechanisms are a bit more effective nowadays.
… and here the corresponding IFP plate called SMP: http://www.fischersports.com/se_se/screw-mount-plate-smp-618?c=1271
You’re welcome, Jared. Yes, I have heard people complain about looseness with NIS but I have never experienced it myself. On roller skis the problem with NIS is many times the opposite when sand and dirt get in between binding and plate; often one really has to use a lot of force to adjust the bindings or slide them off. Nevertheless, there have been incidents reported where an NIS binding has suddenly come off during roller skiing. Very dangerous!
Yeah, the plate completely ripping off definitely doesn’t sound good for business! Interesting about the sand issue for summer months, though. I imagine temperatures affect the fit of the binding on the plate, too.
After the accidents with the binding sliding off the plate, Rottefella started to demand that the NIS bindings for roller skis must be attached with a screw through the binding down into the plate (making the binding non-adjustable). All this made Prolink bindings very popular on roller skis. Shortly thereafter Rottefella introduced a screw mounted roller ski binding.
Interesting history about the plates and roller skis. Is the torque and stress placed upon the binding system for roller skis a lot greater than their winter counterparts?
Yes, it most likely is. And the wear from sand, dirt and sunlight is considerable.
Sounds about right. Funny, though, because you’d think winter would be the more harsher climate 🙂
Thanks Jared, for a very comprehensive overview. However, Salomon’s Prolink is actually not an SNS binding.
Hey Magnus,
Good catch! I had always just treated SNS as a proprietary term used by Salomon for every binding since it’s just an acronym for “Salomon Nordic System.” Clearly they’re differentiating between everything they’ve produced prior to Prolink. I will update the text as soon as I can. I also need to update the page to include the other NNN compatible bindings such Fischer’s Turnamic.
Thanks, again!