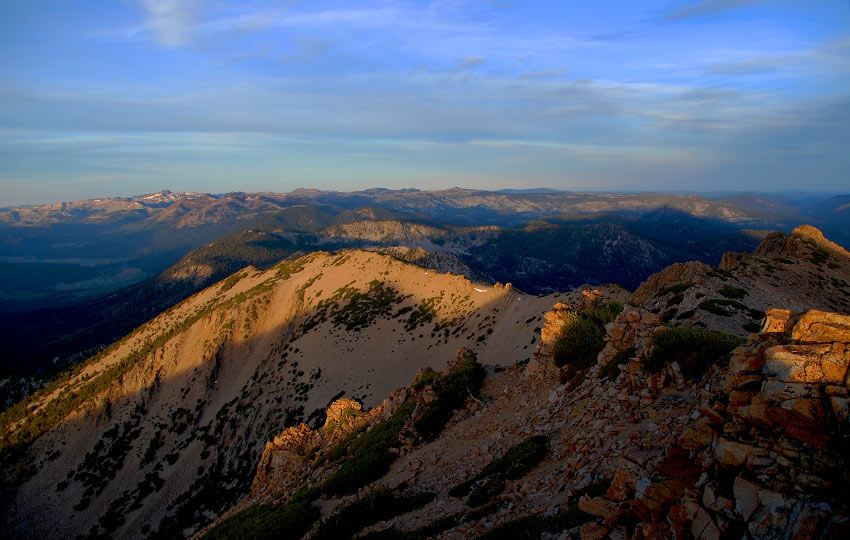
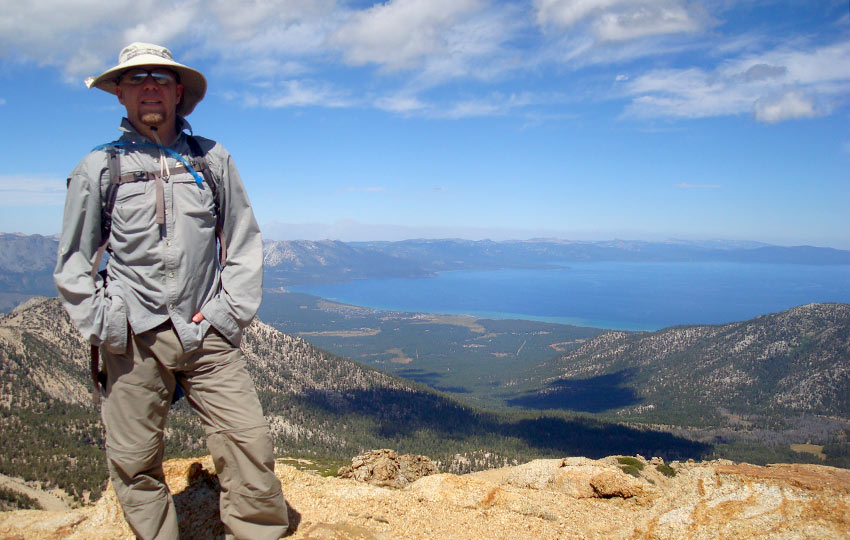
Hiking Freel Peak, Jobs Sister, and Jobs Peak in one shot is a goal shared by many Tahoe locals and weekend visitors. It’s an arduous but relatively safe route. It’s mostly above treeline, so it offers 360 degree views for miles in all directions.
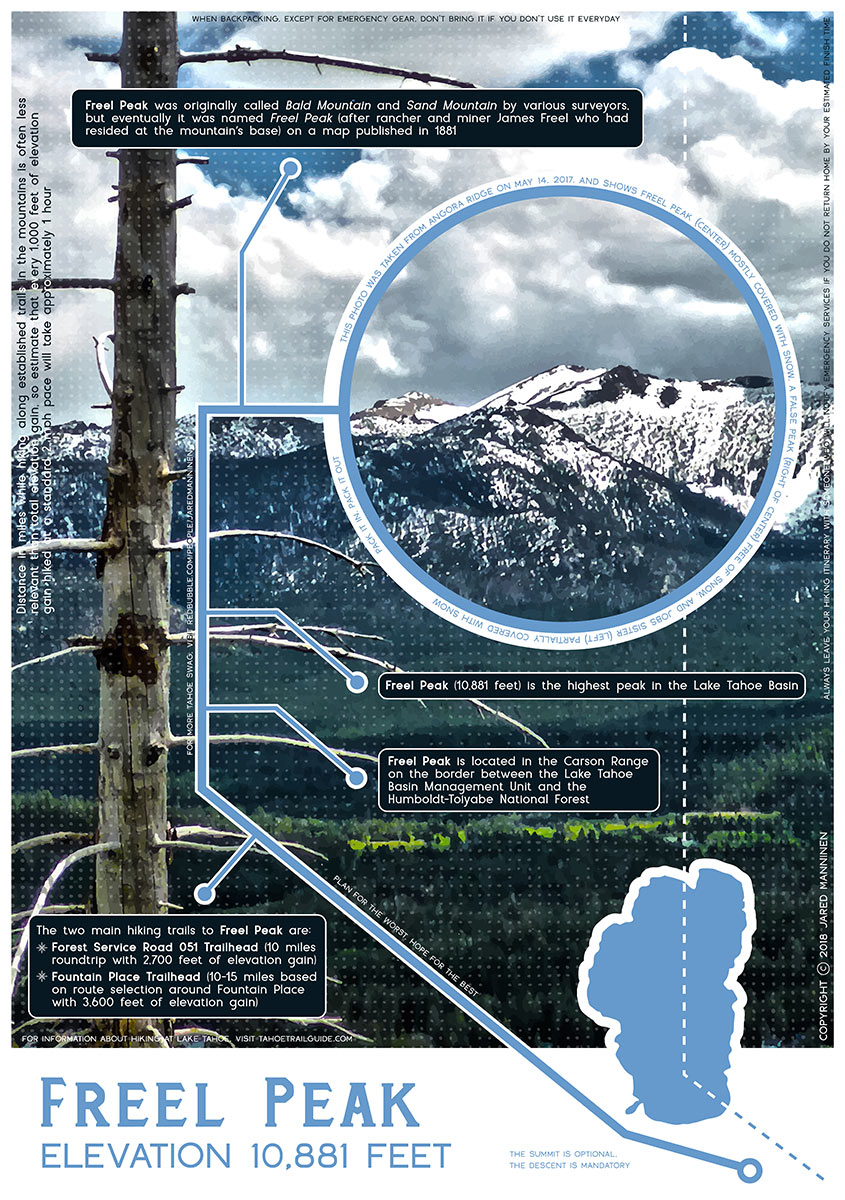
Each of the three peaks featured in this hike sit above 10,000 feet. And Freel Peak is the highest peak in the entire Lake Tahoe Basin at 10,881 feet. Also note that Jobs Peak is technically outside of the Lake Tahoe Basin (aka watershed).
Support Tahoe Trail Guide with a financial contribution via PayPal (single contribution) or Patreon (reoccurring contributions). Your support of Tahoe Trail Guide is very much appreciated!

There are some variations to this three-peak excursion. However, the clockwise route described in this blog is the most common way of accomplishing the feat.
So with a little prior planning and some moderately athletic preparation, you can successfully hike Freel Peak, Jobs Sister, and Jobs Peak in a day.
Hiking Freel Peak, Jobs Sister, and Jobs Peak Trail Data (approximations):
- Location: South Tahoe – Luther Pass
- Category of Hike: Day Hike, Multi-Day Hike
- Total Mileage: 12 miles
- Total Elevation Gain: 4,100 feet
- Highest Point: 10,881 feet
- Trail Conditions: Alternating between hard-packed and sandy soil
Considerations for Hiking Freel Peak, Jobs Sister, and Jobs Peak in a Day:
- Confirm that the gate to Forest Service Road 051 is open and your vehicle is equipped for the road conditions.
- Plan for the worst, hope for the best. This route features at least 5 miles of fully exposed terrain that sits at 10,000 feet of elevation or higher.
- Begin your hike earlier than shorter day hikes to give yourself enough daylight with which to work. This also enables you to get off of the higher peaks before any afternoon storms roll in.
- Adhere to all Leave No Trace principles.
- There are few trail signs and markers on public lands in the Tahoe region. So unless there are tracks to follow, the correct route may be difficult to identify. When in doubt, turn back.
- Be prepared for inclement weather by carrying plenty of warm clothes, food, and water.
- Leave an itinerary of your plans with someone who’ll call emergency services if you don’t return by your prescribed time.
- Dogs are allowed, but keep them on leash and pick up after them.

Parking Directions for Hiking the Tahoe Trifecta:
The most simplified version of the parking instructions for hiking Freel Peak, Jobs Sister, and Jobs Peak is this…
Take SR 89 about 9-10 miles south of Meyers, CA, to Forest Service Road 051 (aka Willow Creek Rd). This gated dirt road is approximately .75 miles beyond the official Luther Pass sign. Drive up that dirt road for 3.5 miles. Park in the big open dirt area on the left. And then hit the trail.
Those were the basic instructions provided to me by a friend the week prior. Mind you, we both happened to be hiking Mount Tallac when she gave them to me. And that was on January 7, 2012. It was a low-snow winter that year. So, many of us were hiking peaks in the Lake Tahoe Basin well into January!
I was looking to hike Freel Peak the following weekend, but the only route I knew was long and grueling. I described this to my friend that day on Tallac. And that’s when she mentioned the slightly easier approach to Freel Peak that I’m sharing in this article.
My friend’s instructions were simple and accurate. However, I didn’t pay close enough attention to some key details (and clearly didn’t ask enough questions!).
Needless to say, my hike of Freel Peak the following weekend became an experience that I, nor my hiking partner, will never forget. The day also became “that which we do not speak of” forevermore.
If you’re already familiar with the Luther Pass area, take those above instructions and run with ’em. But I recommend reading further for detailed information about Forest Service Road 051. This is where you’ll park for this route.

Freel Peak and Jobs Sister are technically located within the Lake Tahoe Basin. However, both peaks straddle the border between the Lake Tahoe Basin (managed by the Lake Tahoe Basin Management Unit) and Humboldt-Toiyabe National Forest.
This is important because the most common trailhead to access this three-peak hike is via Forest Service Road 051. This road is also called Willow Creek Road on some maps. Furthermore, some Tahoe locals call it Crystal Mines Road.
Regardless of what you call it, this rugged/rough dirt road is located within the Humboldt-Toiyabe National Forest. So it’s managed by the Humboldt-Toiyabe National Forest office in Carson City, NV.
Again, FS Road 051 and it’s gate isn’t managed by the Lake Tahoe Basin Management Unit in South Lake Tahoe, CA.
The reason this is important is because the FS gate at the entrance of the road is locked for many months of the year. There are no specific open/close dates for the gate. That’s based on the conditions.
The gate remains locked during winter months. But in 2017, the gate remained closed until the end of June. This was due to the harsh conditions remaining from the 2016/17 Snowmaggedon (i.e. epic winter). There were deep ruts and mud/water zones in the road from that winter. And it would’ve been impassable for a standard passenger vehicle.
The day I drove the road (July 4, 2017) to assess it for vehicle access, I witnessed a Toyota RAV4 safely coming down the road. But on my way out I met some folks who were in a newer Ford Mustang. They only made it about a half mile past the gate before having to turn around.
You don’t want to add another seven miles (round trip) of unnecessary road walking when you’re planning to hike Freel Peak, Jobs Sister, and Jobs Peak. I’ve traveled this road by foot voluntarily and by necessity many times. And, the additional miles make an already long day, longer.
Before you leave the house consider the time of year you plan to hike this route. Then, confirm that the gate is unlocked and your vehicle is appropriate for driving the road.
Assuming you’re good-to-go, take SR 89 out of Meyers, CA. And then head south for approximately 9 miles to Luther Pass.
You’ll find FS 051 on the left (north side of SR 89) about three-quarters of a mile beyond the Luther Pass sign. This will be on your descent into Hope Valley.
This road is easy to miss since it’s surrounded by trees and lacks any official trailhead indicators. Although, there is a small stop sign for traffic leaving the road and turning onto SR 89.
Slow down at about a half mile beyond the Luther Pass sign. Keep your eyes out for the road, and be aware of traffic backing up behind you. You don’t want someone thinking that you’re sightseeing and then passing you on the left at 65-70mph. All the while you’re target fixated on finding the road and making the left hand turn onto it!
Most people don’t even realize FS 051 exists. So they’re not prepared to come to a dead stop driving downhill in a 55mph zone. This could happen when waiting for oncoming traffic to clear before making the left hand turn onto the road. I apologize for belaboring what may seem like mundane details about the fine art of driving an automobile. However, everything I write is born out of direct experience and it’s my desire to help you to avoid catastrophe.
After spotting the road (the first section is paved), turn onto it and proceed uphill.
Please note that the gate is actually set back in the forest, so it’s not visible from SR 89.
Your vehicle needs moderate clearance to safely navigate the 3.5 miles of dirt road leading to the trailhead.
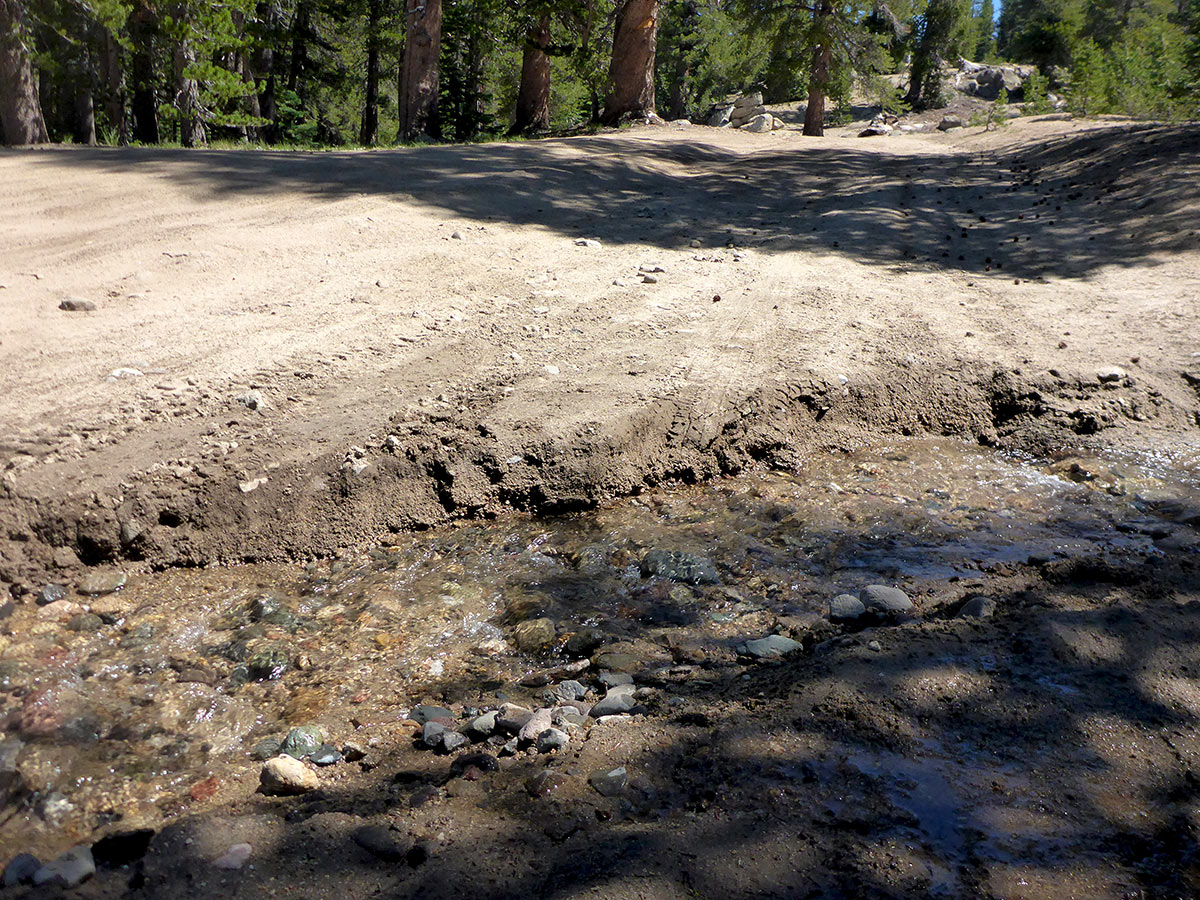
Prior to the road’s occasional grading, you’ll sometimes need a four-wheel drive vehicle with high clearance to negotiate a series of deep ruts soon after the gate.
No matter what, this road has many obstacles such as rocks, roots, and ruts that will wreak havoc on a small two-wheel drive car. For my first 12 years living at Lake Tahoe, I drove a two-wheel drive coupe. I never bothered to attempt driving up this road (even after the road was graded). This is one reason why I have so much experience traveling it by foot – haha!
After roughly 3.5 miles from the gate, you’ll find an open dirt area. It should show obvious signs of vehicle use. And there will probably be a couple of parked vehicles nearby. This parking area will immediately follow the second small bridge that you will cross.
The Forest Service recently installed an official trailhead sign (as seen directly below) at this location. I honestly never knew that this area was called “Horse Meadows.” But that sign makes it super easy to find the parking area. And it’s located immediately after that second bridge on FS 051.
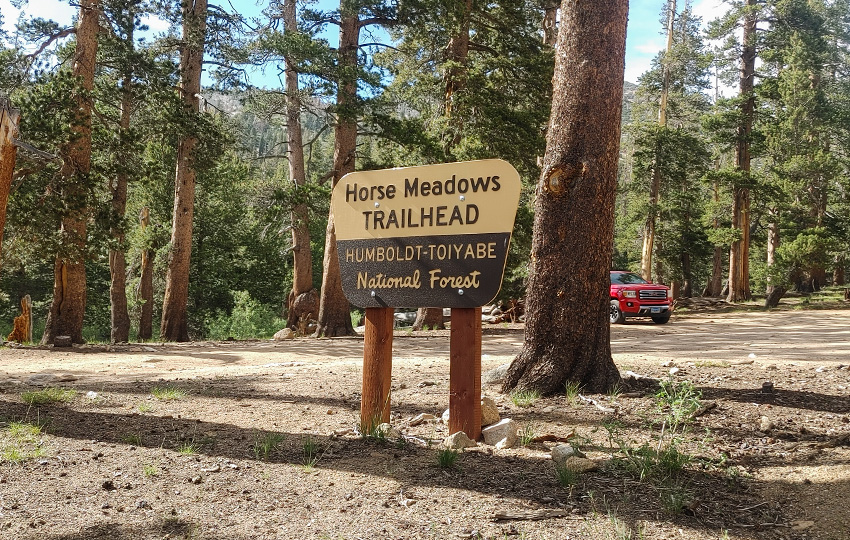
While standing in this parking area, look to the left for the hiking trailhead sign. There’s a small foot bridge that crosses Willow Creek just beyond the sign, and it’s here that you’ll begin your journey.
Again, the small footbridge is at the beginning of the trail to Freel Peak (and on to Jobs Sister and Jobs Peak).
FYI … FS Road 051 continues up the hill for another mile or so and splinters off in various directions. However, the main road eventually dead-ends at the base of the trail that leads to Jobs Peak.
If you were only hiking to Jobs Peak, park near the end of the dirt road and save yourself some mileage. However, if you’re hiking Freel Peak, Jobs Sister, and Jobs Peak, park at that large area near the main trailhead.
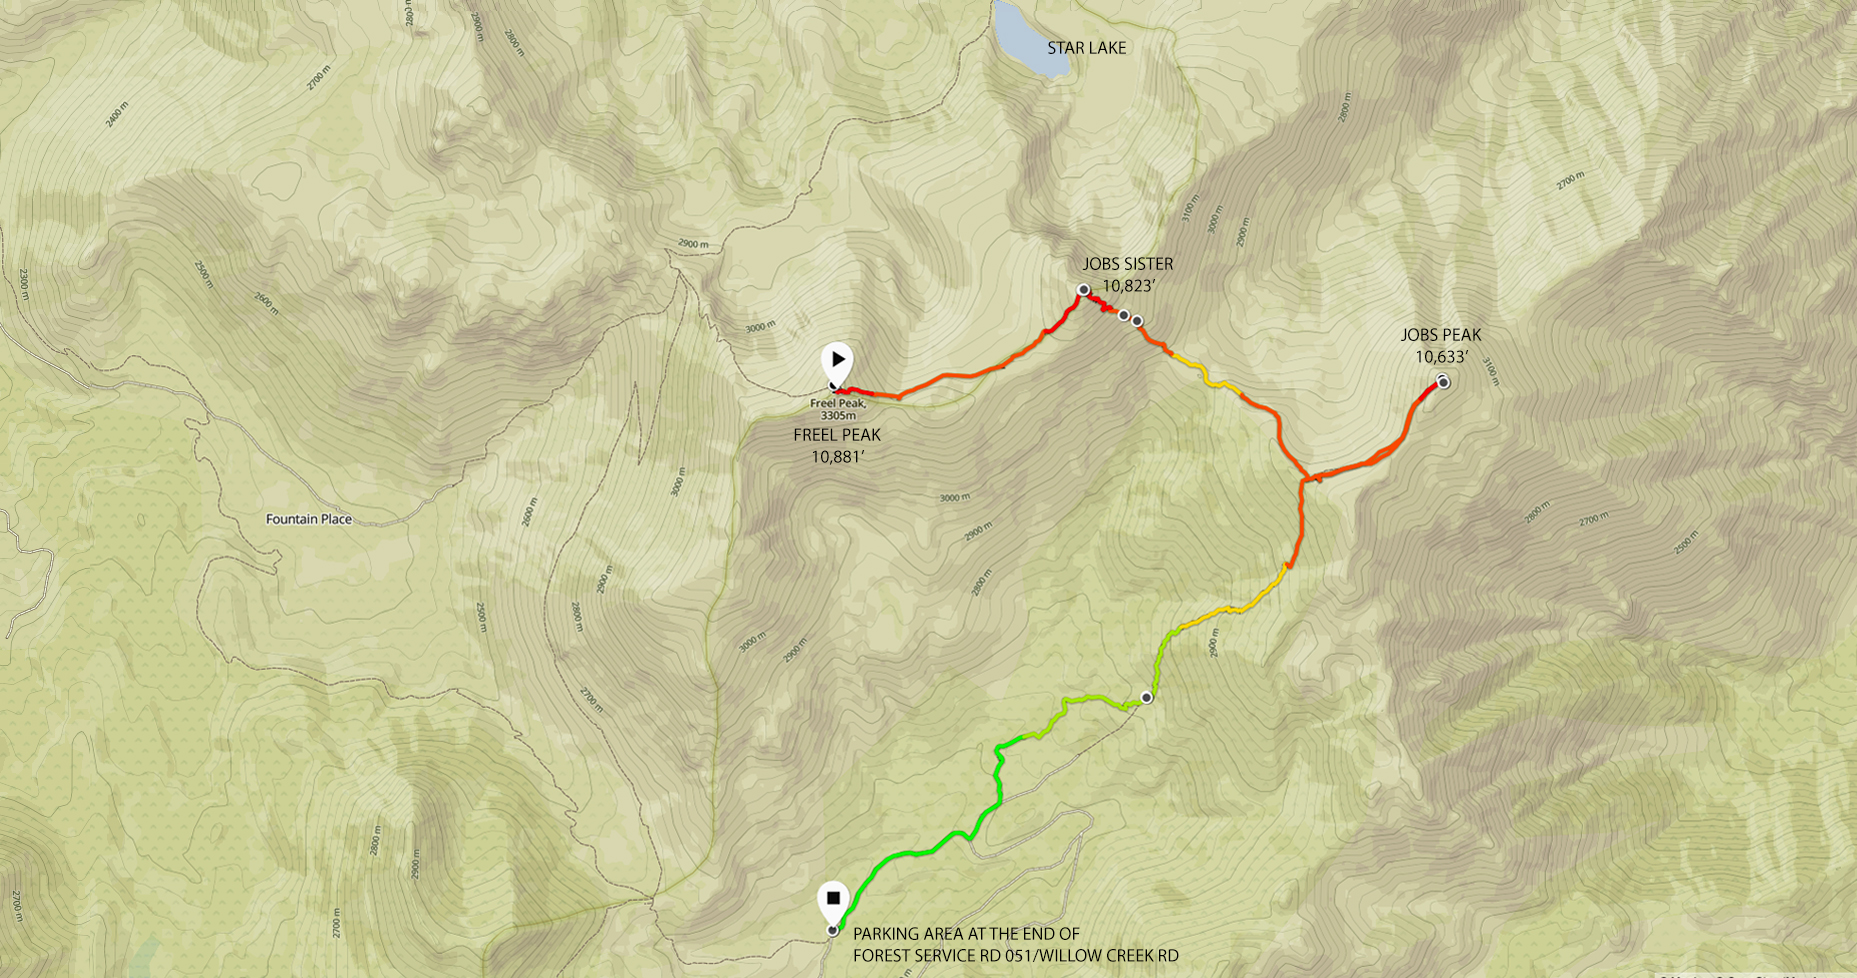
Here’s a map to assist you in finding FS 051 (aka Willow Creek Road) for accessing the trail to Freel Peak, Jobs Sister, and Jobs Peak.
Travel along the Freel Peak, Jobs Sister, and Jobs Peak Route:
The first thing to note about this three-peak hike is that most people travel this route in a clockwise direction. And this is what I’m describing in this blog.
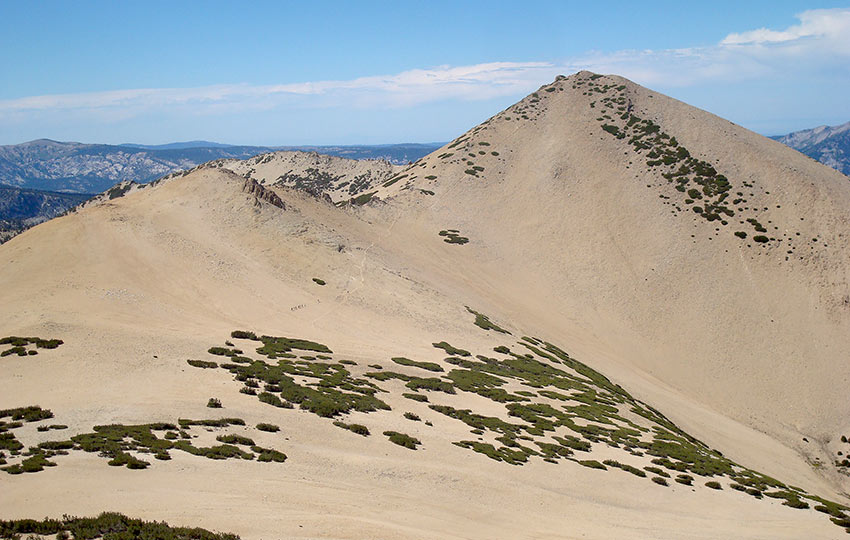
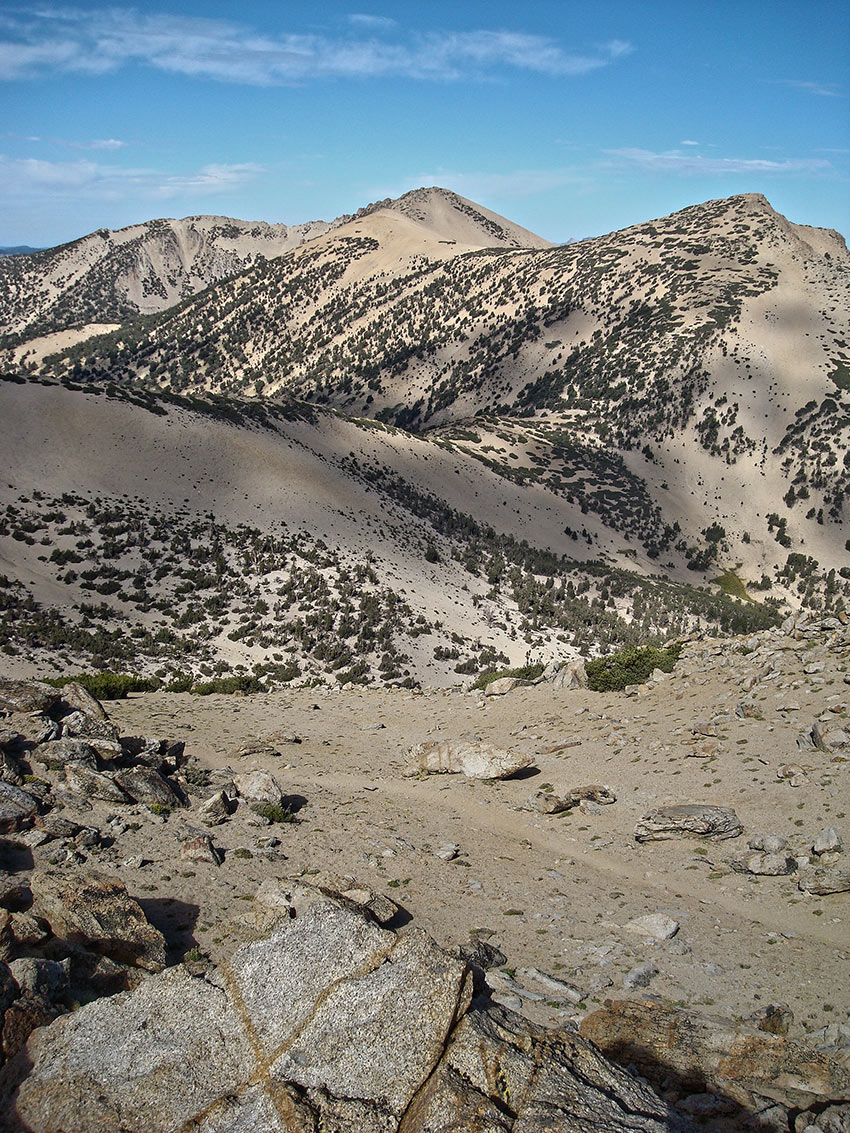
The reason for this is that there is a steep sandy section below Jobs Sister. It’s not something you have to worry about falling off of or needing specialized climbing gear or skills. This section is just exhausting to hike uphill because it’s essentially an 800 foot section of vertical beach.
Minimizing exposure will increase your chances for a successful and safer hike. Basically, you don’t want to be trapped in any one section for too long.
Other than that, it’s six of one and a half dozen of another whether you choose to hike clockwise or counterclockwise. But know that this blog is written with the intention of hiking the traditional clockwise route.
About 1.25 miles after setting off on your adventure from the trailhead near the parking area, you’ll reach Armstrong Pass. This junction is also where the trail links up with Tahoe Rim Trail.
At the Armstrong Pass junction choose the trail that travels northeast, in the direction of Star Lake and Freel Peak. This will be to the right as you look toward Lake Tahoe.
If you instead traveled south along the Tahoe Rim Trail, you would end up at the Big Meadow Campground near SR 89. This will obviously not get you to Freel Peak!
And if you hiked the trail that travels northwest (along the left side of Armstrong Pass as you look toward Lake Tahoe) you’d link up with Fountain Place Road and the Corral Loop mountain biking trail system. This will also prevent you from reaching Freel Peak!
So, veer right and contour the west-southwest facing aspect of Armstrong Pass.

After approximately 3 miles you’ll reach a small saddle between Trimmer Peak (nearer Lake Tahoe) and Freel Peak.
There will be a sign at this saddle indicating that Freel Peak is one mile away. Take that trail and start heading uphill.
You’ll have to negotiate a number of small switchbacks through weather-beaten Whitebark Pine trees. At this point, you’ll have reached about 10,000 feet in elevation and be fully exposed to the elements.
Keep in mind that you’ll continue to be exposed for the next five miles.
Lake Tahoe averages about 275 days of sunshine each year, which is why so many of us love living here. However, we’ve also experienced our fair share of punishing storms.
When hiking around Freel Peak, Jobs Sister, and Jobs Peak, never assume things are going to magically work themselves out when life goes sideways.
Respect the mountains by having contingency plans.
To me that means carrying a topographic map of the area and identifying evacuation routes. I keep a close eye on the weather throughout the day. I also wear adequate protection against the sun, wind, and rain. In addition to carrying enough food and water for the trip, I carry enough to last me just beyond the allotted time to complete the route. I also continually monitor my hiking pace, as well as my mental and physical states.
The five mile stretch above 10,000 feet is my favorite part of this route. However, it’s also arguably the most dangerous section. This is because once you begin your ascent of Freel Peak there aren’t many places to go in case of emergency.
Fortunately, because there are endless panoramic views along this route you can navigate by line-of-sight. For the most part, you should be able to spot bad weather from miles away.
Again, however, make sure you have a backup plan if something goes wrong.
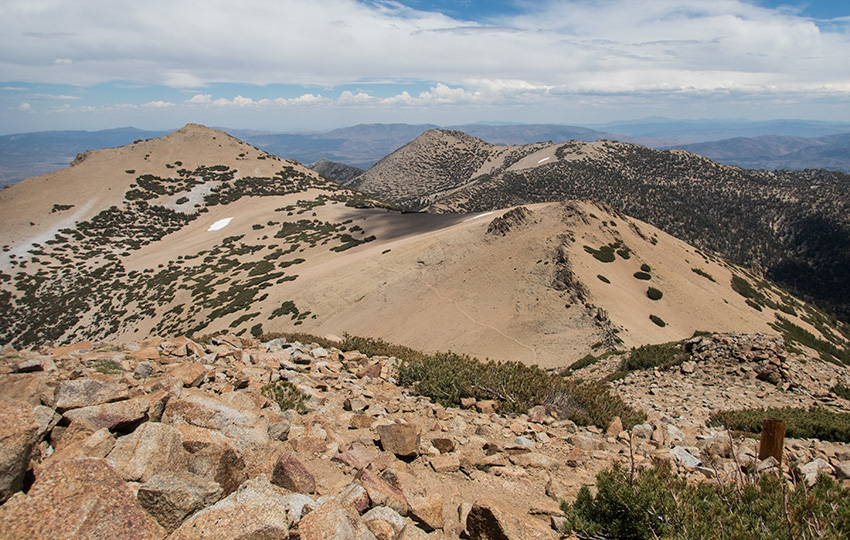
Traveling from Freel Peak to Jobs Sister and then from Jobs Sister to Jobs Peak is easy to navigate. You literally can see where you are going the entire time.
Just note that it’s pretty steep once you drop off of the backside of Jobs Sister. Fortunately, though, the terrain is sandy so it’s fairly easy to descend. And it’s not quite as punishing on the knees compared to more rocky trails 🙂
Hike the saddle to the southeast and than continue to contour the adjacent ridge to Jobs Peak (which is in a northeast direction from the saddle).
After descending Jobs Peak you’ll reach the same saddle that you hiked from Jobs Sister. However, don’t travel back toward Jobs Sister! The trail to reach FS 051 is much closer to that trail you just hiked back from Jobs Peak.
The way may not be obvious immediately, but keep looking for a break in the forest. And then continue downhill into the forested area on the beaten path. This trail is well-worn since it’s the main route to reaching Jobs Peak (which people often do for a day hike). So you shouldn’t need to do any sort of bushwhacking through this section to get back down to the dirt road.
This section is approximately 1.25 miles, and it’ll take you back to FS 051.
Walk the road for another 1.5 miles to your vehicle.
Mission accomplished!
One last self-indulgent note…
Some people refer to this hike as Tahoe’s “Triple Crown.” I avoid using that term, though, since it already holds an established place of honor in the hiking world.
For those who aren’t familiar, the Triple Crown refers to the big three American long-distance hikes. These are the Appalachian Trail, Pacific Crest Trail, and the Continental Divide Trail. Each one of those hikes takes between four and six months to complete.
Also consider that in the horse racing and baseball worlds the term Triple Crown refers to season-long accomplishments. As a former Appalachian Trail thru-hiker (1999), I can tell you that hiking Freel Peak, Jobs Sister, and Jobs Peak in one day is a workout, but it’s not that hard! It’s ultimately just a day-hike, so let’s try to keep some perspective on the matter – haha 🙂
Please forgive me and my obsession with semantics.
Here is an infographic I created about Freel Peak. Order your copy at RedBubble.
Do you have other insight, feedback, or trail updates about hiking Freel Peak, Jobs Sister, and Jobs Peak?
If so, please post it in the comment section below for the benefit of everybody 🙂
Such a great post – thank you! I am doing a backpacking trip next week, staying two nights at Star Lake and am planning on doing the three peaks as an out and back from there on the second day.
Hey Jason,
Thanks so much for the kind words 🙂
Sounds like a great trip that you have planned! Be safe out there, and take lots of photos 🙂
Jared
What an excellent write up thank you! Been looking at these peaks forever and wondering how to get up there, this gave me the confidence to hike the 3 peak loop yesterday. Absolutely stunning views!
Fortunately the worst part of the road is just after the gate. Remainder is currently in great shape. Descent from Jobs Sister is a sandy black diamond ski run not for the faint of heart. Was a bit concerned about finding the return route off the ridge, but noted in your map that it was much closer to Jobs high on the ridge and not at the low point of the saddle between the 2 peaks where I originally looked for it.
Hey John,
Thanks for the great feedback!
Yeah, that first part of the road right after the gate always seems to be the crux. I guess it’s probably a good thing that the most difficult part is right there rather than it being further up the road (where people might find themselves not only stuck, but stuck in a slightly more remote location). I do find it interesting, though, that so many rocks have been ground down over the years on that dirt road thanks to peoples’ oil pans and undercarriages 🙂
The vertical beach on the backside of Jobs Sister is a fun one 🙂 Not nearly as fun going up it, though, which I’ve done at least once – haha!
It’s tempting to take that lower point in the saddle along the ridge between Jobs Sister and Jobs, and it is possible to make it down that way. However, that’s a lot more work because there isn’t a trail. Glad you found the right way.
Again, I appreciate you reading my article and contributing to the conversation. And so glad you were finally able to hike this route confidently!
Jared
Thanks for this great guide. A friend and I did this on July 4th. The road was passable to any car that has is designed for off pavement driving (not sedans, minivans, etc.). There is enough water in the creeks below the peaks to fill a bottle if you need. It blew like crazy so we couldn’t enjoy the awesome views for that long, but the flowers were blooming. The trail down, after the ridge from Job’s Peak, is steeper than a normal forest service trail, as a 53 year old who can run a 6:45 mile, I was sorry not to have my hiking poles. I would go back just for Freel.
Hey Michael!
Thanks so much for the kind words. Glad you found my post useful 🙂
I’m also glad to hear that you completed the whole 3-peak adventure! Believe or not, I hiked Freel Peak on July 3rd. I didn’t do all three peaks as I was taking my time documenting wildflowers, but it was great to be up there just the same. I don’t think it was quite as windy when I was on the peak, however.
And a 6:45 mile is pretty spectacular! It’s been a good 20 years for me since I’ve been able to run that 😉
Jared
Hey Jared,
I am interested in trail running/hiking the 3 peaks in a couple of weeks. I am familiar with the TRT out or Armstrong Pass up to Freel, but wanted to ask is the trail visible and easy to follow from Freel to Jobs Sister then to Jobs? I was looking at both your maps and the loop oab from Armstrong looks easy to follow but wanted to ask and make sure. I would like to do the clockwise route to and from Armstrong Pass. I volunteered at the Tahoe 200 back in 2019 there. We were able to make it up the dirt road from Hwy 89 in my husband’s Subaru and hope it will be the same now. Also, I wanted to confirm it the total mileage is 12 miles on that clockwise loop. Thanks!
Hey Stephanie,
I apologize for my delayed response! I saw the notification when you first posted the comment, but clearly I dropped the ball on getting back to you until now.
All of that said, yes, it’s about a 12 mile (maybe slightly less) loop starting at Armstrong Pass (via FS 051/Willow Creek Rd). The trail to Freel Peak is quite obvious, and then the connection between Freel Peak and Jobs Sister is all line-of-sight travel above treeline (so that’s pretty obvious, too). From Jobs Sister to Jobs Peak you’ll be dropping down a steep, sandy section and then running the saddle over to Jobs Peak. That’s not quite as obvious but, again, it’s all primarily above treeline so the navigation is relatively easy. Honestly, the most challenging part will probably be when you’re retracing your steps from Jobs Peak to the trail that leads down to FS 051/Willow Creek Rd again. I suspect, though, that there’s been plenty of foot traffic along the route that you shouldn’t have any problems finding it. As far as the condition of the dirt road goes this season, I honestly haven’t driven it yet. So I’m not 100% sure as to what condition it’s currently in. I’m willing to bet that your Subaru will do fine, though. And the most challenging part is usually just on that first incline nearest the gate (and SR89). If you can safely negotiate that, you should be fine the rest of the way.
Again, I really apologize for taking so long to get back to you. Let me know if you have any other questions. And if I come across any updated info regarding the conditions I’ll be sure to pass it along.
Take care!
Jared
Thanks Jared! We’re headed up there on Saturday and will see if we can get all three peaks in. A 12-mile trek isn’t too bad. No need to apologize, I appreciate your input, it is definitely helpful!
Excellent! I hope you have fun 🙂 I did take a quick drive up to the gate on Tuesday and saw that the road was pretty rutted out for the first 30 meters, but once you get through that you should be fine.
Hello, Jared,
Back in the early 90s, I remember an old ranger station or fire lookout on top of Freel Peak or Jobs Sister. Can you confirm?
Thanks.
Cynthia
Hey Cynthia,
You are correct in that there used to be a structure on Freel Peak. I believe it was some sort of radio relay tower. There’s still remnants of the operation in the form of cables, pipes, and other small metal fixtures, but they decommissioned the actual structure many years ago. So, now people essentially have unobstructed views all around. I just hiked up to Freel a couple of weeks ago, and it’s as beautiful as ever 🙂
Thanks for reading and commenting!
Jared
Impressive! Thanks for sharing ?
Thank you for the kind words ? I appreciate it!
I’m thinking about doing this trip from the Fountain Place entrance instead. Is that insane? The mileage looks like it would be 17ish? Feel free to talk me out of this plan if there’s an obvious reason.
Hey Jordan,
I don’t know that I’d call your proposed route insane, but I’d definitely classify it as ambitious 🙂
The added distance which, as you’ve estimated at about 6 miles (approx. 17 total miles), is one thing. The extra elevation gain is what I’d be more concerned with as far as slowing you down. If you park at the top of Fountain Place Rd, you’ll be at roughly 7,700′. And the only way to go from there is straight up. From the dirt road on the backside of Luther Pass (FS 051), the starting elevation is closer to 8,200′. And, the hike up to and through Armstrong Pass is mostly just a longer traverse (until you reach the Trimmer Peak/Freel Peak intersection on the TRT). Then, no matter where you start you’ll be going straight up.
The benefit to taking the Fountain Place option is not having to drive up and over Luther Pass and then up the dirt road on the backside of Freel (FS 051). That drive can take long, but you wouldn’t necessarily save time on your journey by taking Fountain Place because you’ll have more elevation gain and miles to cover. You’d mostly just be saving the gas by not driving as far.
The uphill battle from Fountain Place would make for a long start to your day. Not impossible, but if you’re not training for anything in particular I’d just recommend hiking Freel, Jobs Sister, and Jobs from the standard route as explained in this article.
That said, you could shave a couple miles off of the Fountain Place route (Armstrong Pass Trail 18e09 on the south side of Armstrong Pass, if that’s what you were planning) by traveling off-trail on the north side of Fountain Place. There’s a draw that leads directly up to the Trimmer Peak/Freel Peak intersection on the TRT from the top of Fountain Place Rd. Basically, hug the base of the south face of the Trimmer Peak mountain area at Fountain Place (be sure not to cross or travel on the private property up there). This route is not technically directly below Trimmer Peak, but rather the 9,700′ (no name) summit directly south of it. Hike along the base of this mountain to the stream and take that draw directly uphill. There’s often a footpath that travels parallel to the stream/draw (on the west side). You should’ve ever have to cross that stream/draw. Keep in mind that this is even more straight uphill and you’ll have to negotiate a “vertical beach” for much of that route. I haven’t written about this particular route because it is a challenge and not necessarily obvious to people who’ve never been up there. I’ve hiked it a handful of times and have since left that to more ambitious folk than I 🙂 Now I just take the FS 051 route as it’s generally easier to navigate and not quite as much as a slog. If you hiked in the clockwise direction around the three peaks from this starting point, I’d then just recommend taking that Armstrong Pass Trail (on the south side of the pass) back to Fountain Place (as opposed to retracing your steps back down that draw).
Anyway, whatever you choose will be a great adventure. Let me know what you ultimately decide and tell me how it goes!
Jared, thanks for taking the time to write the detailed experience. All the tips provided ensure a pleasant day including the traffic issues turning from 89 on to 051 (trail head). I like this style, I do it myself and have been considered a bit long winded but you won’t be able to say I didn’t tell you. I do my homework and “seek to be understood”. Pay now or pay later!
Anyway, I feel very good about your directions but I have added a GPS to my navigation cache. I’m routinely practicing with my Garmin 60 CSx. I was wondering if you have any coordinates for this run?
Also if you have any other experiences on comparable hikes that would be appreciated as well.
As a rule, have your vehicles been safe in these parking areas? I know to bear proof my P.U. but it’s the knuckleheads I dread.
Again, Thank you,
Luke
Hey Kevin aka Luke,
Sorry for the delay in responding. I spent this past weekend on the north shore of Lake Tahoe doing research on the Donner Party. Good stuff!
Thanks so much for the nice feedback, btw! I usually try to keep it brief, but it seldom happens 🙂 I began to format my trail articles with the basic information at the beginning so that if a person just wanted the facts they could find them quickly. However, I feel compelled, particularly on more challenging routes such as this one, to offer more detail. I get annoyed at sites that gloss over the hazards/considerations of a trail (in lieu of motivating their readers to get out there?). Those sites remind me of the scene in “This is Spinal Tap” where the band is ready to rock ‘n roll, but they get trapped in the basement of the concert hall because they never bothered to figure out how to get to the stage. haha
Anyway, once I finish this reply I’ll email you the route in a GPX format. It’s actually broken up into two legs as one of the times I did this trifecta (and recorded it) I took a friend and we camped on top of Freel (hence the two files). Honestly though, the only GPS I use is my Suunto Ambit 2 watch, and that’s just to record my routes to double check my map reading abilities. Basically, I only use a map/compass for navigation. So, I’m hoping you’ll know what to do with the GPX files. If that’s not what you’re looking for, get back to me and tell me specifically what you need. I’d include them for direct download on this site, but WordPress treats the GPX files as a suspicious for some reason. Something I need to research further.
I will say this, though. I’m 99.99% positive that the gate at FS 051 is locked at this point in the season (11/19/18). Usually it’s one of the first gates in the Lake Tahoe region to be locked as it sits at a higher elevation. And usually the Forest Service begins to lock all the gates around November 15th. So, either plan for the extra 7 miles (round-trip), or save it for next year.
That said, the loop hike around Stevens Peak (which I posted recently) might be more appropriate now. It’s about a 12 mile hike with 7 miles of off-trail travel. I’ll include that GPX file as well in the email.
As far as thefts/break-ins at Tahoe trailheads, I’ve never had a problem. That doesn’t mean it doesn’t occur, because I have read articles in recent years about the increase of theft. But, again, I’ve never had a problem. I seem to recall a higher percentage occurring at trailheads with easy access to a highway or state route (i.e. quick getaway) versus trailheads located at more obscure and small dirt roads. I would also avoid leaving any scented items in your vehicle (bear proof canisters or not).
Thanks again for getting in touch. Let me know if you have any other questions!
-Jared
Can you send the files for the Freel Peak hike via Horse Meadow?
Hey Brad,
I will also email you a GPX file, but this page ( https://tahoetrailguide.com/freel-peak-via-forest-service-road-051/ ) details the information more succinctly about hiking Freel Peak via the Horse Meadow trailhead.
Do you have a GPS file for this route? Thank you G
I’ve hiked Freel, Jobs Sister, and Jobs on the same day, but day prior to owning a GPS. Since getting a GPS I’ve rehiked the route a couple times and have turned it into a two-day excursion camping out up top, so I have the route in XML format (but split in two files). If you’d like it, contact me through the contact form so I can get your email to send it to you (I don’t have the ability to attach files here in the comment section). Thanks for reading!
Hey Jared,
Took a moment to realize it was you. Have been pursuing a 5 peaks in 9 days plan, which has required some adjustment, but part of it includes Job’s, the Sister, and Freel, all of which I’ve done before, separately and at once. I did the Horse Meadows Route to Job’s many, many moons ago. Came down in twilight, couldn’t find my car, and encountered a caretaker driving the road in the dark. He was in charge of the cows out there at the time. He took me to his permanent camp for some food and then we drove the roads till we found my car. He pointed out lion tracks on the ground there, but maybe he just wanted me to feel I’d gotten my money’s worth for the generous tip I’d given him.
At any rate, Job’s is the present obsession, and I spent some time on 051 yesterday. In fact I put some work into fixing the dry moat at the beginning with pieces of timber, gravel, and loose soil I shoveled into some of the depressions on the right side of the road as you enter from Luther, using a spade I’d brought with me for the purpose. I drove about 2 miles up the road using the wrong kind of vehicle, a Subaru, which I couldn’t use at all until my road work. I was just doing some reconnaissance yesterday and will go back tomorrow with my 4-Runner.
I was frustrated by the lack of signage, and your blog was helpful. I’ve looked at the trail head maps, but it helps to know I have to go 3.5 miles to the first car park. I knew there was an extra leg forking to the right to get closer to Job’s proper.
When I did the three of them years ago, I accessed Freel Peak via High Meadows and spoke to a few people sitting on the top. A lady at the top suggested doing Job’s and catching the Sister on the rebound, which I did.
Hey Daniel, Great to hear from you!
That road seems to always be rutted out right at the beginning, so thanks for your trail fixing service 🙂
I’m also glad that my blog helped you find your way. It seems like there’s always been a general lack of signage in Tahoe. Something that’s struck me as odd ever since I moved here.
I hope you achieved your five peaks! Sounds like a fun challenge. And, to be honest, it seems like you’re always on some sort of fun adventure, especially about the caretaker. Haha! That’s a fun one 🙂
Anyway, thanks again for tuning in and reaching out. Hope you’re doing well! I’ve just been working a lot this summer and trying to be outside as much as possible 🙂