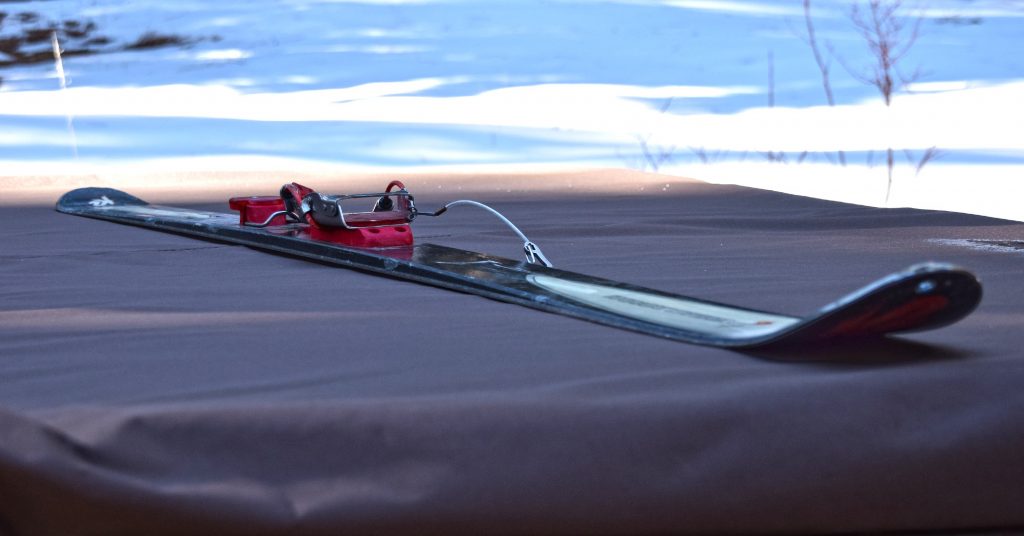
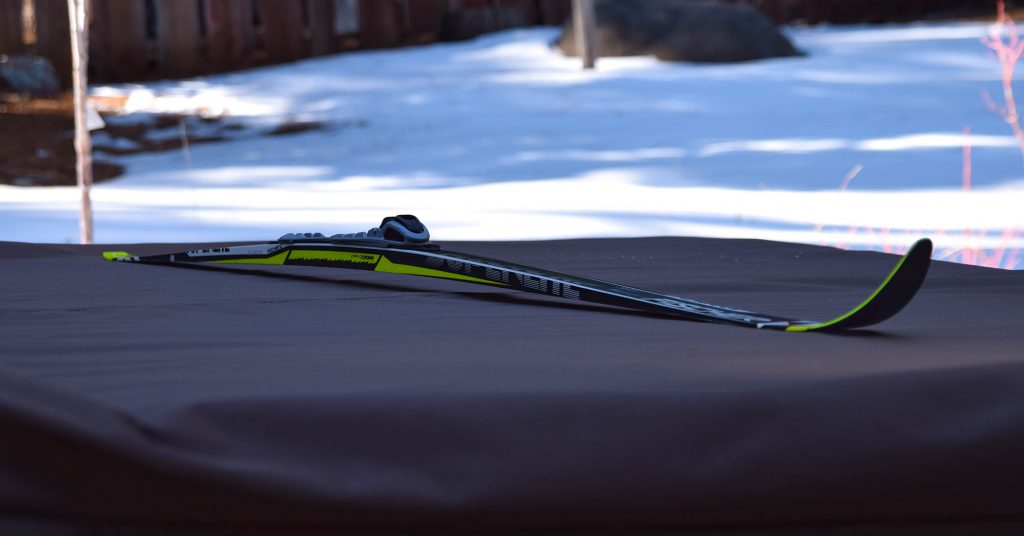
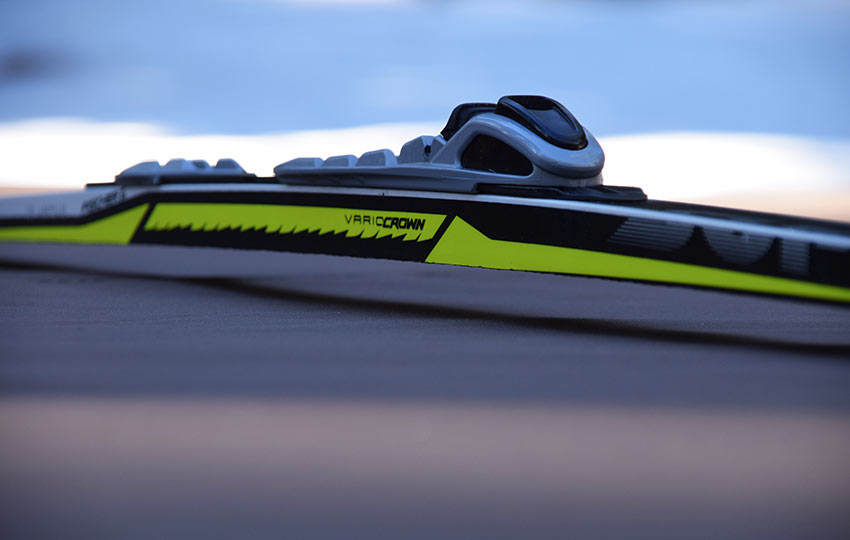
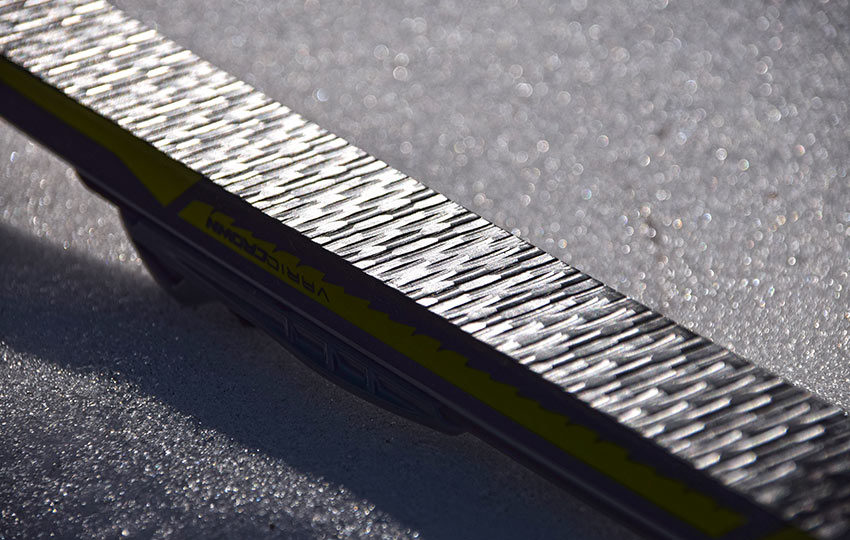
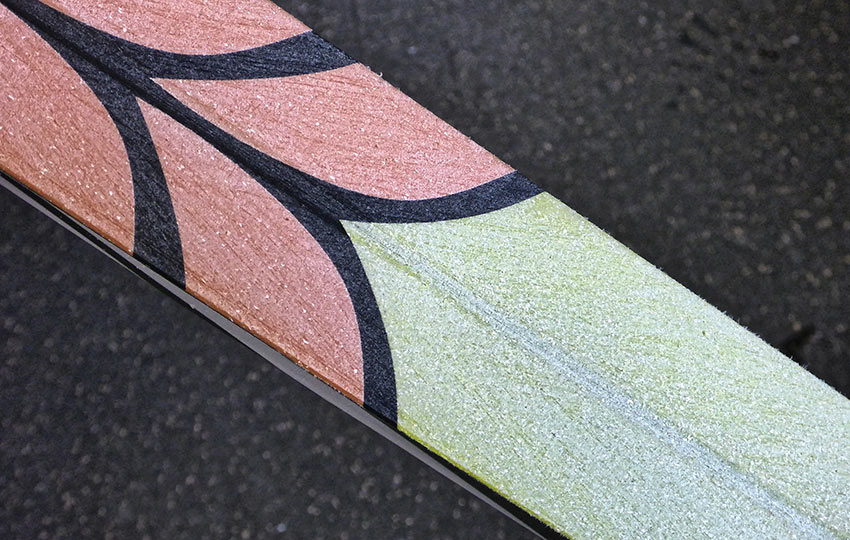
There are many design features that make a classic cross-country ski unique. But, arguably, the most distinct is the grip zone. This area directly underfoot accommodates grip wax or features a textured pattern such as fish scales or a skin-based technology. Occasionally you’ll find grip zones made with surfaces that are designed to be roughened up. Regardless of style, this unique feature of classic xc skis enables you to grip the snow (and move forward).
That last part is why the grip zone is a classic cross-country ski’s most defining feature. Without it and its associated double camber, you’d be unable to push-off. And, pushing off is the first phase of the quintessential classic skiing technique of diagonal striding.
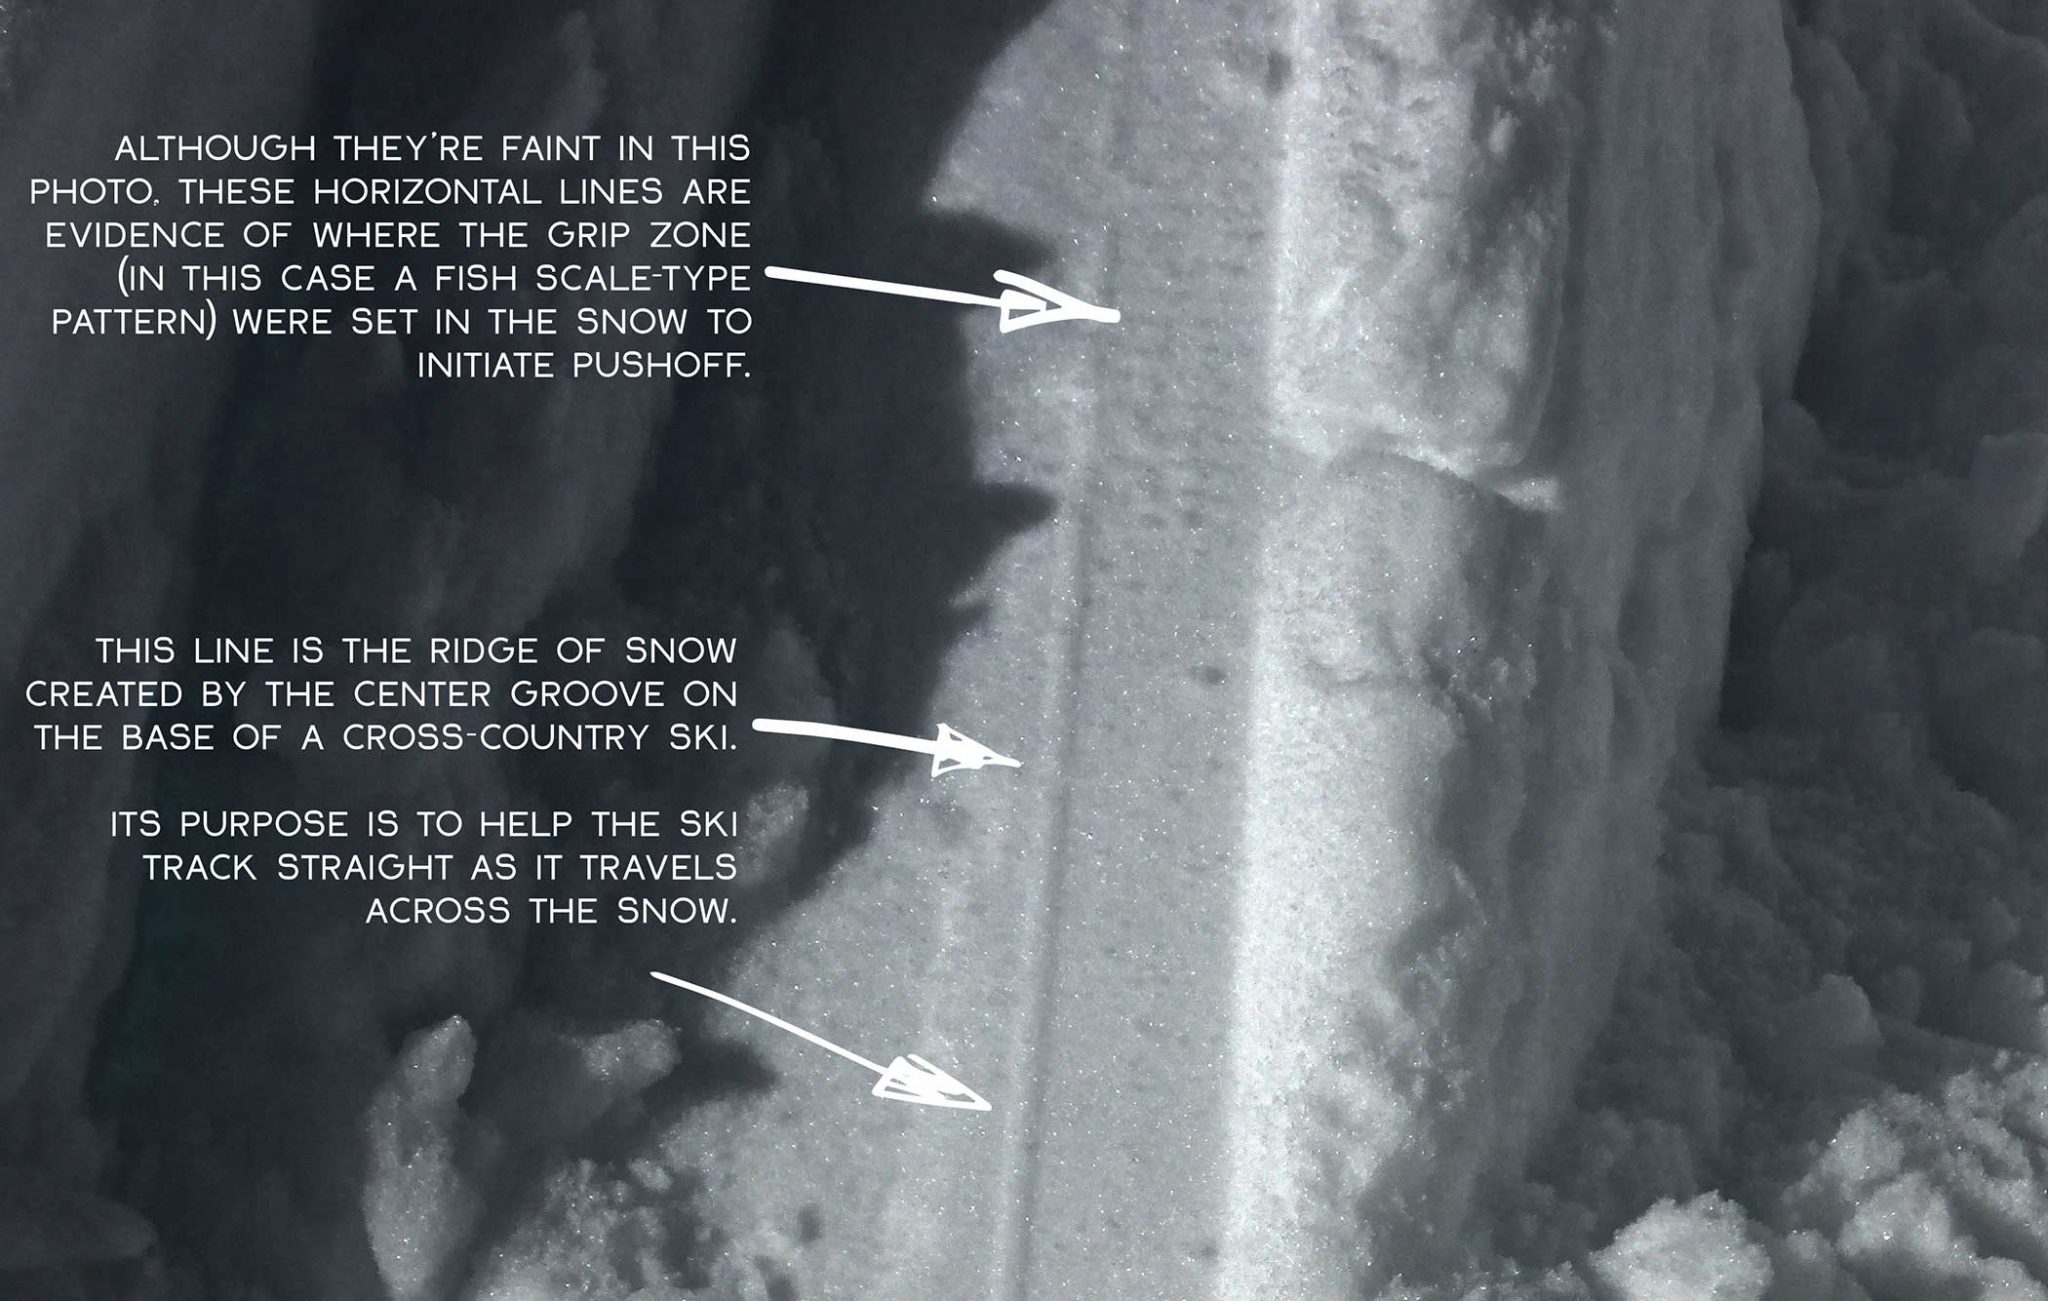
Please note that diagonal striding is also referred to as kicking and gliding. However, many instructors (including myself) avoid the term “kick” when describing classic technique because it’s an inaccurate descriptor. Just know that people still use “kick zone” as well, and that they’re referring to that area on the base of the ski underfoot that is textured.
Support Tahoe Trail Guide with a financial contribution via PayPal (single contribution) or Patreon (reoccurring contributions). Your support of Tahoe Trail Guide is very much appreciated!

There are variations of a grip zone on different types of hybrid skis and snowshoes. However, in the realm of actual skis the grip zone is specific to classic cross-country skiing. You’ll never find anything remotely similar to it on an alpine ski.
That said, you can fix “skins” to Alpine Touring (aka Randonee) and Telemark skis, as well as split boards. These skins enable a person to climb up a snowy mountain. Then, when the adventurer reaches the summit, those skins come off for effortless gliding down the mountain.
As fun as all of that sounds, what I’ve just described is very different from traditional cross-country skiing.
Again, the grip zone of a classic cross-country ski is the area on the bottom of the ski that you’ll either find “fish scales” or apply grip wax that’ll enable you to grip the snow and propel forward.
This only tells half of the story, however. The grip zone is inextricably linked to the ski’s camber. To understand just how unique the grip zone is, you need to consider the ski’s overall design. Then, you have to look at how skiing technique works with that design.
This means that I have to pull a quick bait-and-switch of the conversation. So, please bear with me for a paragraph or two or three…
The Purpose of a Cross-Country Ski’s Double Camber
Lay a classic ski on a flat surface and look at its profile. Notice the long, graceful arc that spans nearly the entire length of the ski. This arc or flex is known as “camber.” The camber of a cross-country skis is very pronounced compared to that of an alpine ski.
In fact, most cross-country skis have what’s called a double camber. On the other hand, alpine skis generally feature single cambers, reverse cambers (aka rockers), or just lay completely flat.
I don’t want to bog down the conversation by describing the different types of cambers. Suffice it to say that they each come with their own sets of pros and cons. With xc skiing the double camber is essential. This is because we spend most of our time skiing uphill, across flat areas, and over undulating terrain.
The first camber spans the length of the ski. Its purpose is to distribute your weight across both skis while keeping the grip zone off of the snow.
For example, you won’t drag the grip zone while on both skis during a downhill descent or while double poling. Dragging the grip zone would create undue friction that would slow you down. Most people who have been on cross-country skis can easily understand this.
The second camber is a bit trickier to understand if you’ve never learned proper diagonal striding technique. This is because it’s directly tied to the technique.
For all intents and purposes, imagine that the second camber spans the length of the grip zone (or vice versa?!). To engage the grip zone (i.e. dig those scales into the snow) you must completely flatten the ski. You can only compress the ski by transferring all of your bodyweight onto one ski. Simultaneously, you have to dynamically compress the ski by incorporating a slight drop of your bodyweight onto that ski.
The ski will be completely flat during this fraction of a second. That allows the grip zone to make effective contact with the snow. At that moment, you’ll have a point on the ground from which to push off (to the other ski). And, then you repeat that process continually as you diagonal stride.
Essentially, without the second camber you’d constantly drag the grip zone while gliding. This is because the glide phase of diagonal striding always occurs with your body weight over one ski.
To clarify that last point … just balancing all of your weight onto one ski should not be enough to completely flatten it. The second camber should be stiff enough to necessitate that brief, dynamic drop in weight. Again, this is so that the grip zone stays off of the snow just long enough to achieve glide.
For choosing the correct length of classic ski (for your weight), read the second part of this cross-country ski series of articles. It’s titled… Geometry of Classic Cross-Country Skis.
Also worth noting is that there are stiffness ratings (soft, medium, stiff, extra stiff) often used with more expensive skis. This rating system is based on the ski’s flex (camber). And, it informs you about what you could expect from the ski’s overall performance, including characteristics of the grip zone.
For example, an extra stiff ski will provide a lot of pop when pushing off. However, its grip zone will probably be very specific (i.e. small) and require exceptional technique.
No matter what type of classic ski you use, though, you can always determine its specific grip zone length by performing the paper test (also see Part 2).
Types of Grip Zones of Classic Cross-Country Skis
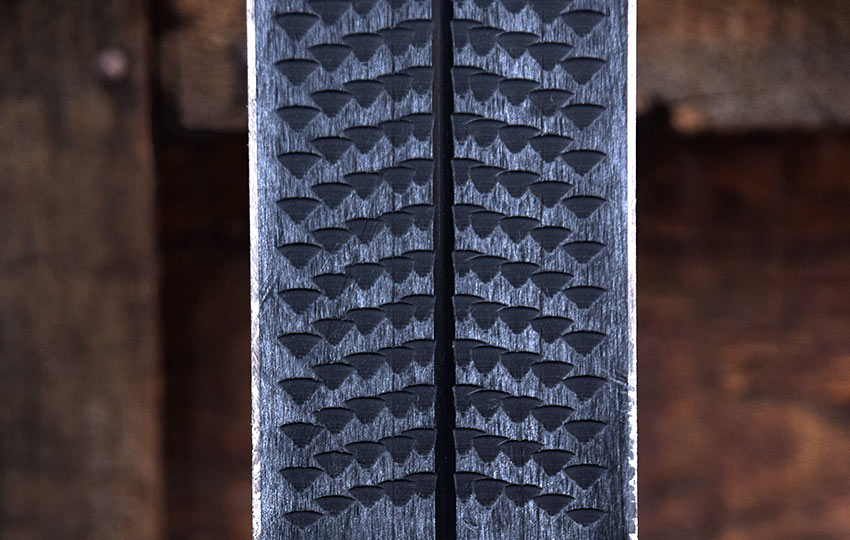
Again, the grip zone is the area of the base of the ski located underfoot where you’d find a textured pattern to achieve grip on the snow. As I mentioned above, this area is the the kick zone or wax pocket (waxables).
The style of classic skis you’re running usually determines the length of the grip zone. For example, race skis feature shorter grip zones while backcountry cross-country skis have longer grip zones. The grip zone of a typical recreation ski will fall somewhere between those two.
Keep in mind, that you should also consider the length of the grip zone in relation to the overall ski length.
Race skis are generally the longest of the classic cross-country skis. So, race ski grip zones are not only short in general. They’re also short in relation to the overall length of the ski. This means that there’s a lot more glide zone on those race skis. They can travel a lot faster, which is obviously what you want in a race-oriented ski. But since their grip zones are smaller, they’re more challenging to run.
On the other hand, backcountry cross-country skis are generally the shortest classic skis. And, they usually feature an exceptionally long grip zone. Therefore, the grip zone can often make up half of the base of the ski. This means that you’ll achieve a lot of grip, but not nearly as much glide.
Recreational and touring-oriented xc skis will often fall somewhere between race and backcountry skis. Not too long. Not too short. And, they’re grip zones will usually be moderately aggressive.
For race-oriented classic skis, the grip zone will be minimal and designed for use with grip wax. The shorter length allows for longer and faster glide. Grip wax (when properly matched to the snow conditions) provides ideal grip during the push-off phase. At the same time, it minimizes friction when gliding (due to wax’s ultra-low physical profile).
If you’re going to use waxable classic skis, though, your diagonal stride technique needs to be top-notch. And, you have to understand how to correctly choose and apply the grip wax. Depending on your region’s typical snow conditions this could be challenging and, therefore, frustrating.
Both of those “requirements” can take years to master. So, you’ll probably be better served by running “waxless” classic skis.
The truth is, for most of us waxless cross-country skis are the best choice. They’re more convenient to maintain (no grip wax needed), generally less expensive, and more readily available.
Fish scale-patterned waxless skis are the most common waxless skis. I prefer them because they basically work in all conditions. They may not work great in any one condition. However, unless you’re racing good enough is usually good enough.
On the other hand, other waxless skis tend to function ideally in more narrow temperature ranges and snow conditions. Skins (a pseudo-skin or hair type of material) and zeros (surface designed to be roughed up with sandpaper) are an example of this.
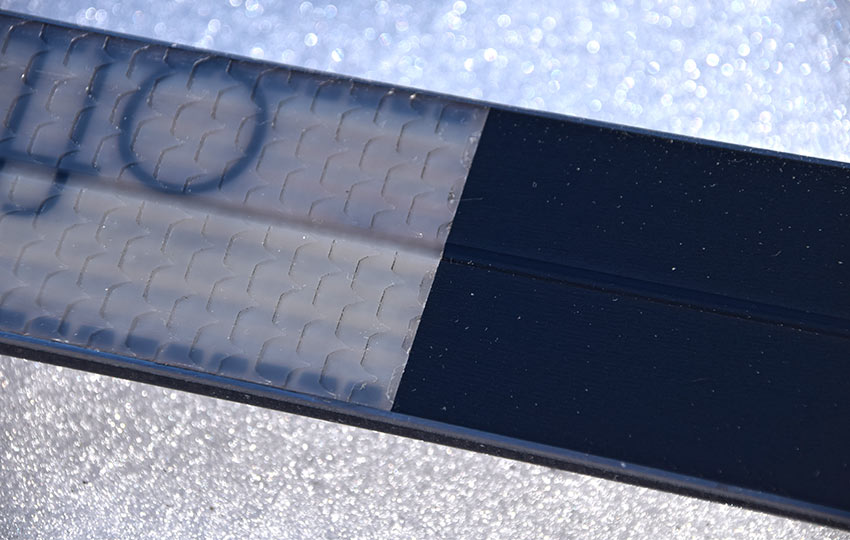
Some fish scale patterns are completely uniform across the length of the grip zone. Others feature a tapered section at the beginning and ending of the grip zone. This is to provide a smoother transition between the grip and glide zones.
Some scale patterns are cut into the bases (negative), while others protrude from the bases (positive).
Some scales are an extension of the existing base material (P-Tex), whereas others incorporate a totally different material.
Backcountry xc skis feature long and aggressive grip zones, enabling you to achieve better grip in variable terrain. The downside is that this long scale pattern will more easily drag. So, this can cause you to slow down during your descents.

Some ski manufacturers incorporate one solitary patch of skin into the grip zone (i.e. Salomon Equipe and Aero 9), while others use two (i.e. Fischer Twin Skins).
Which is more effective?
Solomon will tell you the one, while Fischer claims the two.
Another note about skins is that, if left untreated, they can become soaked with water causing excessive drag. This often occurs during spring skiing when the snow melts excessively due to the warmer temperatures. I’ve experienced this personally and witnessed it first-hand with other skiers, and guess what? … It sucks.
There are various treatments for skins to make them hydrophobic. Manufacturers recommend spraying the treatment onto a clean rag and then wiping the skins with the rag. This, instead of spraying the substance directly onto the skins. There are two reasons for this recommendation. The first is that the cleaning agent can damage the base of the hair-like follicles. The second reason is that it can eat away at the adhesive that actually fixes the skin to the ski.
Fortunately, you can replace skins relatively easy after they’ve worn out.
Zeros were designed to work optimally at 0 degrees Celsius (freezing or 32 degrees Fahrenheit). Zeros give you some creative control over which type of pattern you’d like in the grip zone. This is because they’re designed for you to scuff with sandpaper.
Skins and zeros aren’t as versatile as fish scales. However, they’ll function better in the conditions for which they are designed because they’re more specific. Just be sure to consult the manufacturers for their specific recommendations.
And they generally cost more because they were designed for specific conditions. So, mostly you’ll find racers using them and the occasional recreationist. That said, due to their increased popularity in recent years they’re is a wide selection of them on the market.
I’ve only had the opportunity to test a few pairs of skins and zeros. So, my experience is limited in determining the ideal conditions for which they work best. What I can say, however, is that they all generally run faster than my fish scale-patterned skis. Their grip zones are shorter and the grip materials create less drag (so long as those skins are treated!).
What this also means is that you need to have really good technique to achieve grip. This is especially evident going uphill. You also have to be comfortable going downhill at a pretty fast clip.
For beginners, neither of these scenarios normally apply.
I live at Lake Tahoe where the conditions in the Sierra Nevada Mountains feature diverse weather conditions. For example, it’s not uncommon to experience morning temperatures of 15 degrees (F). And then, by midday, watch the thermometer reach 45 degrees (F). This was the case for most of January 2018, which we Tahoe locals referred to as “June-uary.”
This big swing in temperatures causes a huge transformation of the snow over the course of a single day. And, then, it also affects the remainder of the season. So, what was effective (grip wax/grip material) in the morning probably won’t work as well in the afternoon.
That’s the reason I usually hedge my bets by running a pair of waxless fish scale-patterned cross-country skis. Good enough is better than it sucks.
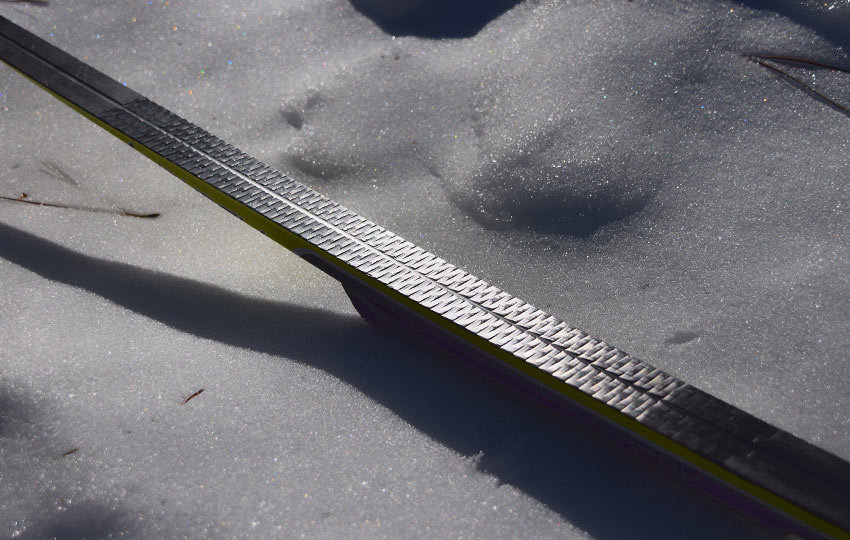
Why is There a Groove Down the Center of My Cross-Country Skis?
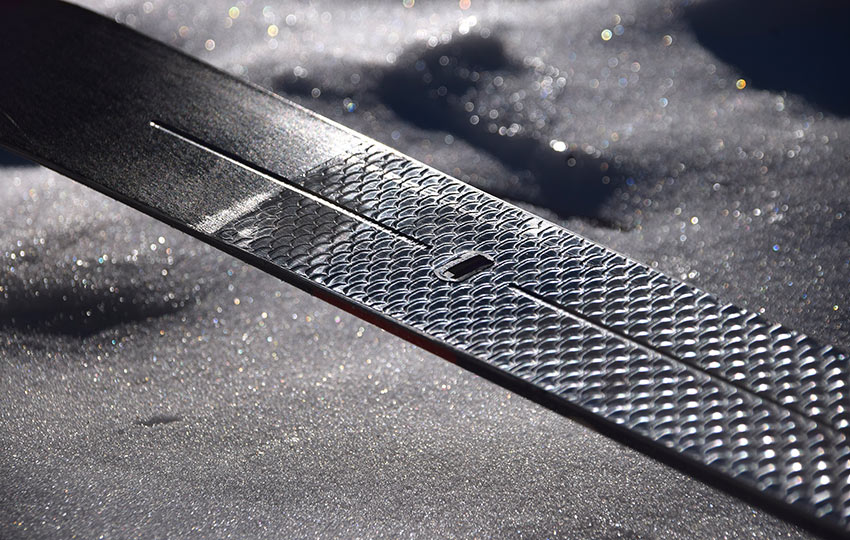
Since we’re already looking at the base of our skis, let’s look a little deeper. There’s another notable characteristic of classic cross-country skis that I’m leading you to, which is the center groove.
The purpose of this groove (or multiple grooves sometimes) is to help the ski track straight. This benign-looking feature provides directional stability by forcing snow up into the groove. As it’s in the groove, it becomes compressed into a small ridge for the ski to travel along.
It works in much the same way (although opposite in shape) as the keel of a boat. As cool as that groove is, though, it makes turning more challenging. That’s because you now have to fight against the directional stability that it’s created.
You can find some backcountry cross-country skis (i.e. Madshus Epochs) that don’t feature center grooves. As such, they’re designed with a better backcountry downhill experience in mind.
Believe it or not, this center groove is old technology. Very old. The first known example of a single groove being incorporated into ski design dates back to 400AD in Finland (Liperi and Ikaalis).
There was a ski (also found in Finland – Salla) that featured five grooves in its base over 3,000 years prior to that. Fascinating stuff! And you can read more about it in the book titled Two Planks and a Passion #ad, written by Roland Huntford.
There are many different types of grip zones available with classic cross-country skis. However, the song remains the same. Incorporate into the grip zone a type of grip wax or textured pattern or material to maximize grip (push-off). All this while minimizing friction (glide phase) for the snow conditions on which you will be skiing.
Ski manufacturers, when making waxless skis, create a fixed length grip zone for a recommended range of body weight. Ultimately, however, every ski’s grip zone is unique in length. This is because it directly correlates to the ski’s flex (camber) characteristics and the skier’s technique and body weight.
This marriage between human and technology is a beautiful thing, but like any marriage there can be problems. And, it’s usually best to wait for the “right one.”
Realistically, it doesn’t matter how much you spend on your skis or what type of grip zone they feature. If you can’t properly compress the ski, you’re never going to achieve good grip. So, invest in your technique more than your gear.
Two more notes:
- Don’t try to run a ski designed for a heavier person. No matter how good your technique is, you won’t achieve ideal grip.
- Don’t try to run a ski designed for a person lighter than you. Even though your technique may be stellar, you’ll constantly drag the grip zone.
There are no silver bullets when it comes to choosing the right type of classic skis. That said, for those of you who only want to own one pair of classic cross-country skis (and don’t plan to race), buy a relatively inexpensive pair of fish scale waxless skis.
Then, invest the money you saved, on lessons. By the time you develop quality technique and want to upgrade your skis, those less expensive skis will make for great rock skis.
Cross-Country Skiing Explained Articles and Videos
Please note that I wrote and produced the Cross-Country Skiing Explained series of articles and videos with the beginner and intermediate cross-country skier in mind. This is the demographic for whom I most often serve(d) while working in the outdoor recreation industry at Lake Tahoe. I basically treat these articles and videos as extensions of the conversations that I have (had) with those customers.
That said, expert skiers probably could take away something of value from these resources. Just know that I don’t address race-oriented philosophy, technique, or gear selection.
Considerations for buying cross-country ski gear (new and beginner xc skiers)
- Intention, Types of XC Skis, and Whether to Buy New or Used (Part 1)
- How Much Gear to Acquire, Evaluate Your Commitment, Value of Taking XC Ski Lessons (Part 2)
- Can One Set of Classic Cross-Country Skis Work for Groomed and Off-Track XC Skiing? (Part 3)
- Can I Use One Set of XC Ski Boots for All of My Cross-Country Skiing Needs? (Part 4)
- Overview of Off-Track and Backcountry Cross-Country Ski Gear
- Invest in Technique More than Gear
Classic Cross-Country Ski Components
- Introduction to Classic Cross-Country Skis (Part 1)
- Geometry of Classic Cross-Country Skis (Part 2)
- The Grip Zone of Classic Cross-Country Skis (Part 3)
- Types of Bindings for Classic Cross-Country Skiing (Part 4)
- Ski Boots for Classic Cross-Country Skiing (Part 5)
- Classic Cross-Country Ski Poles (Part 6)
- FAQs about Classic Cross-Country Skiing
Waxing Your “Waxless” Cross-Country Skis (for beginner and intermediate xc skiers)
- Introduction to Waxing Your Waxless XC Skis
- Step-by-Step Waxing Tutorial
- FAQs About Waxing Your Waxless XC Skis
Cross-Country Skiing Techniques, Demonstrations, and Related Concepts
- Outdoor VLOG (emphasis on the cross-country skiing experience)
- Cross-Country Skiing in Challenging Conditions
- Considerations for Winter Adventure in Lake Tahoe’s Backcountry
- Using the Side-Step and Herringbone Techniques in the Backcountry
- 10 Tips for Spring Cross-Country Skiing in the Backcountry
- 5 Reasons to Love Spring Cross-Country Skiing
- Considerations for Cross-Country Skiing During the Fall and Early Winter
- Discussing the Goal of Becoming a Better Cross-Country Skier and Embracing Backcountry and Groomed Terrain in Pursuit of that Goal
- The Cross-Country Skiing Experience: Immersing Yourself in Winter
Hi Jared. My fish scale is already gone. I don’t want to regenerate it. Can it be replaced with a grease for the rebound zone, but one that works at a temperature of 0(*C).? What You recommend??
Hey Pavlo,
Thanks for reaching out! As far as the scale-patterned grip zone of your xc skis goes, I don’t believe you can actually wear them out. That is, unless you intentionally altered or destroyed them. They’re a permanent part of the base and I’ve never actually heard of anyone skiing them so much that they would wear out. So, I guess I don’t exactly know what to tell you or why you’d think that the scales have been worn down. Is it possible that you were just skiing in icy conditions, for example, and you weren’t able to get any grip as a result? A scale-patterned grip zone isn’t great in all conditions and, unless you’re using really good technique, it is easy to slip with them. Also, I assume that your weight is appropriate for your skis. If you didn’t weigh enough for the skis, you wouldn’t get much grip either. So I’d need more information about your situation before I can offer any real solutions.
That said, if you’re not getting good grip with them you could try and augment them with grip/kick wax. But using grip wax can be challenging depending on the snow conditions that you xc ski in. Using grip wax is a whole art and science unto itself and that’s why “waxless” xc skis were designed — so that people wouldn’t have to worry about trying to figure out the grip wax of the day.
Anyway, provide me more specifics about your situation (type of ski, length, how much you weigh, snow conditions in which you xc ski, etc…) and maybe we can come up with a solution for you.
Again, thanks for reaching out 🙂
Thank you for putting this all together! Your website has been a great resource for backcountry cross-country ski information. Have you ever modified/customized the grip zone on waxless skis? The scales on most skis extend much further than the kick zone and I’m curious if removing the scales fore and aft of the grip zone when restructuring or base sanding could help improve glide? Or would it absolutely ruin the grip? Have you ever done this or known anyone who has?
Hey Ashton,
Thanks so much for the kind words. Glad my website is useful to you 🙂
I’ve actually considered doing something close to what you’re describing, which is either cutting, shaving, or sanding away the furthest ends of the grip zone. I think you could do this without too much fear of damaging the base if the entire base is composed of the same material. For example, a lot of track skis with scale patterned grip zones are all the same base material with the scales carved out of the base. So, I think that would be fine. And a lot of backcountry cross-country skis seem to offer a similar situation in that the entire base is the same material but with the scales carved out of the base material.
However, on Fischer’s line of off-track and backcountry xc skis, the grip zone is a different material altogether. So, I personally wouldn’t try to modify the scales in that situation because I don’t know what the connection is between the base material and grip zone of Fischer skis and wouldn’t want to create some sort of gap between the two materials.
Hope that provide some additional food for thought. If you do decide to try and modify the base of your skis, definitely just test one scale to see how it’s going to work. I’d make that test scale be on the back of the grip zone closer to the heel, just in case something happens that you don’t anticipate. And just remember that if you do modify your skis, that you’re the one doing it of your own free will and not because I told you to do it. I don’t want to be responsible for anything 🙂
Take care, and let me know how it goes if you decide to proceed. I’d be curious to hear about your experience!
I am building my skis with a p-tex base, and am wondering if I should just let the p-tex go all the way across to form the skis’ edges, or use a narrow strip of really hard wood (hickory, e.g.) to form the edges. The old wooden skis I’m using as a model have a different and presumably harder strip of wood along the bottom edges, but of course they don’t have p-tex, they’re just all wood.
Wow! You are, quite literally, building your own set of xc skis. Fantastic! Sounds like a fun project.
I will admit that this is probably way out of my area of expertise. But, for what it’s worth, I’d probably use P-tex for the entire base of the ski. That way you could wax the whole thing a little easier and without worry of damaging the wood (as you scrape the wax off, for example).
All of that said, it’ll be interesting to see how the P-tex turns out. There are two main ways that xc ski bases are made. One is “extruded” and the other is “sintered.” I’m sure you’ve done research on this, but essentially extruded is melted material forming a whole sheet. Then, a sintered base is heated but not melted, and then pressed together. The deal with a sintered base is that it accepts wax a lot more than an extruded base because there’s more “structure” to it. Basically, it’s a lot more “porous” (for lack of a better term) than an extruded base. There are still plenty of skis on the market with extruded bases, though, so it’s not like there isn’t still a precedent for it. I just assume that yours will be more akin to an extruded base since a sintered base most likely requires specific machinery/technology.
Anyway, not sure that helps but it’s what I got. Let me know how the progress goes!
This is a really great article – thanks! I’m building a set of cross country skis and the explanations of the kick zone, double camber, and groove are really helpful!
Excellent! Glad I could be of service 🙂
Let me know if you have any other questions.